


Vue3のCompositionAPIの単体テスト方法を解説!CompositionAPI・TypeScript・UnitTestで堅牢開発
 2021.11.30


こんにちは!
今回は Vue3 の CompositionAPI を用いた単体テストの実装方法を紹介します!
Composition APIは Vue3 で登場したメイン機能の1つで
保守性の高いコンポーネントを定義する事ができます。
Vue3 は TypeScript をサポートしており、Composition API と組み合わせることで、
より堅牢な開発ができる環境になっております。
はじめに
本記事では Vue3 での単体テストの作成方法について解説しております。
単体テストの粒度などは、プロジェクトのコンポーネント分割によって異なると思いますが、 ぜひ参考にしていただきたいです!
単体テスト
単体テストは、ビジネスロジックや汎用的な処理が意図した通りに動作するかをテストします。
単体テストを行うことで、新しい機能が構築されたり、
コードがリファクタリングされてもアプリケーションが機能的で安定した状態を保つことができます。
Vue ではコンポーネント内の個々のロジックのテストをするイメージです。
Vue3 で使用される単体テストフレームワークは Jest や Mocha などがあります。
対象とする読者
- Vue3 で開発したことはあるけど、テストコードを書いた事がない人
- Composition API の単体テストを実装した事がない人
テストコードのメリット
テストコードを書くメリットとしては以下の通りです。
バグの早期発見
テスト実行時に不具合が出るとエラーを発見する事ができます。
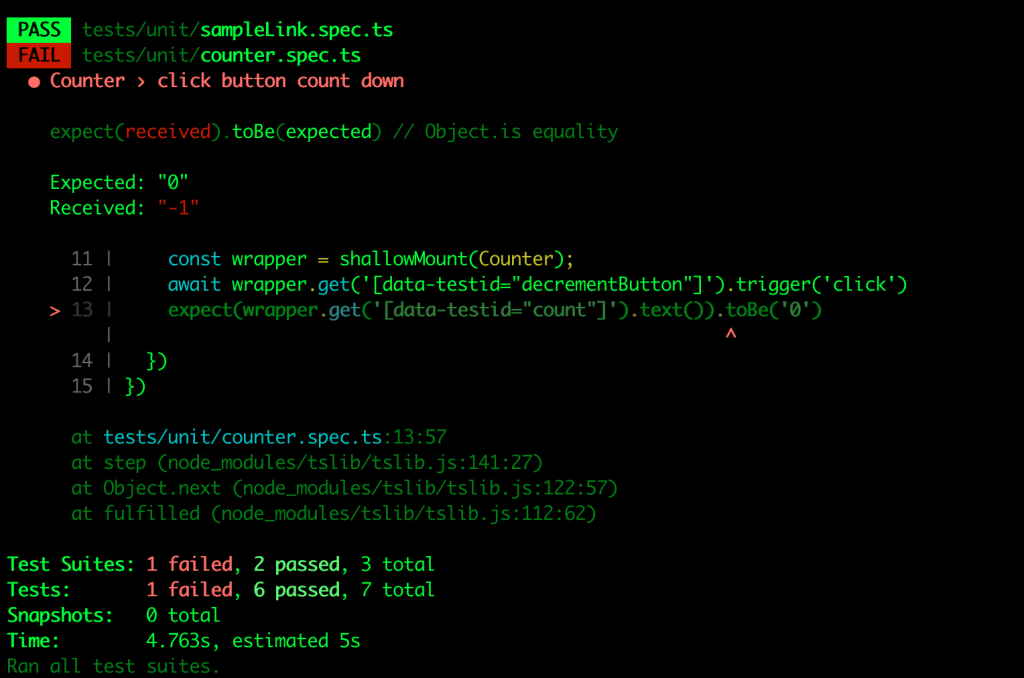
こちらは Vue3 でテストを実行しエラーが出た際の結果ですが、
テスト名やエラーの箇所、想定される値と実際の値などわかりやすく出力してくれるため
どこでどのようなエラーが出ているか見つけやすいです。
プロダクトのソースコードの品質向上
テストコードがあることによって、機能追加時の他部分の影響の確認が楽になります。(リグレッションテスト)
また、実際のプロダクトでテストを導入する場合、
CodePipeline や CircleCI、GitHub Actions などの CI(継続的インテグレーション)ツールを利用する事が多いです。
テストコードを書く事で、バグを本番環境に出すことを未然に防ぐ事ができ、
ソースコードの品質を向上させる事ができます。
要件や仕様が必然的に決まる
プロダクトの要件があやふやだとテストコードを書く事ができません。
テストコードを先に書く事で実装する機能が細分化され、要件や使用が固まっていくようになります。
また新たに参加したメンバーがテストコードを読み進める事で仕様を理解しやすくなります。
テストコードを書くメリットについて理解したところで、
実際に Vue3 で単体テストの作成方法について解説していきます!
Vue3 プロジェクトの準備
今回は vue-cli でプロジェクトを作成していきます。
Vue CLI プロジェクトのバージョンは 4.5.13 です。
まずは以下のコマンドで新規作成します。
# Vue CLIプロジェクト新規作成
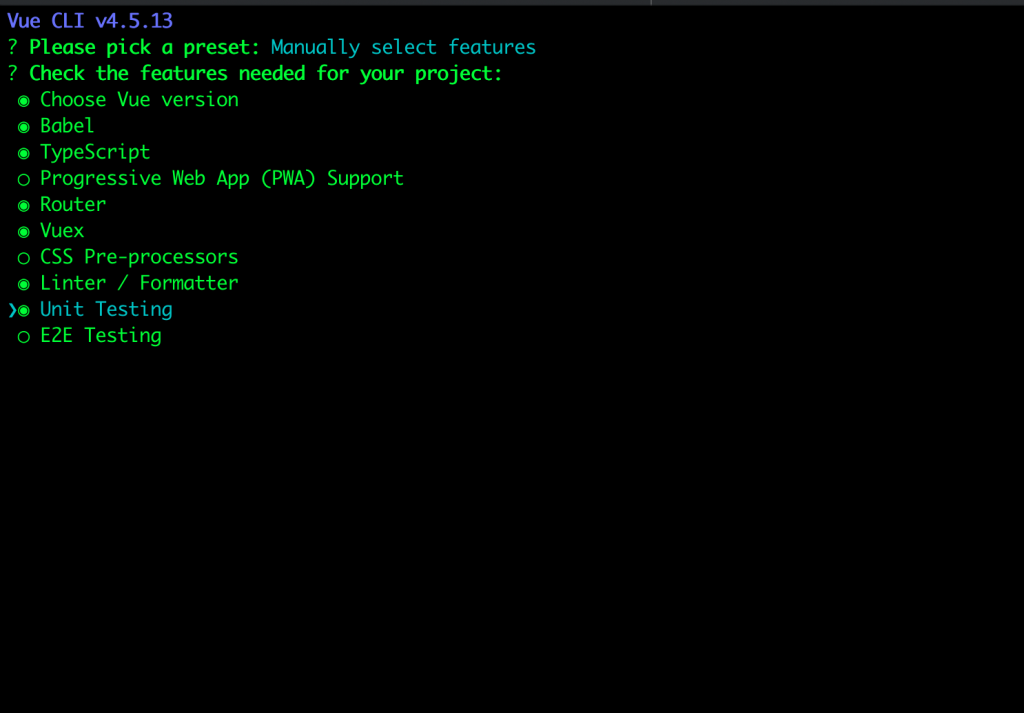
vue create vue3-unit-sampleManually select featuresを選択し、画像のように選択します。
TypeScript、Unit Testingを忘れずに選択しましょう。
その後の質問については下記画像のように選択します。
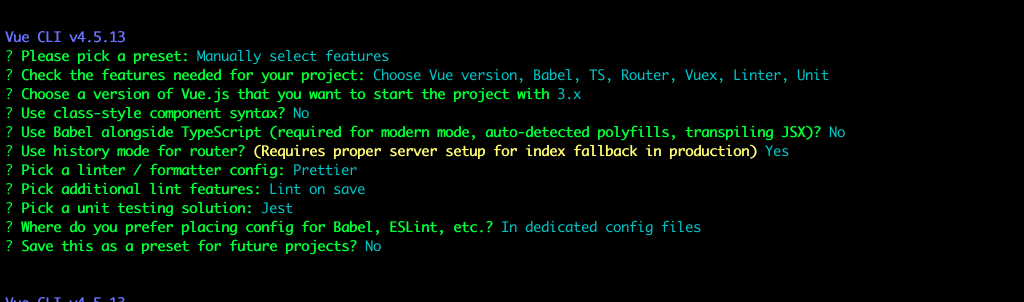
Save this as a preset for future projects を選択後、プロジェクトが生成されます。
設定ファイルのソースコードは以下のようになります。
jest.config.js
module.exports = {
  preset: "@vue/cli-plugin-unit-jest/presets/typescript",
  transform: {
    "^.+\\.vue$": "vue-jest",
  },
};
.eslintrc.js
module.exports = {
  root: true,
  env: {
    node: true,
  },
  extends: [
    "plugin:vue/vue3-essential",
    "eslint:recommended",
    "@vue/typescript/recommended",
    "@vue/prettier",
    "@vue/prettier/@typescript-eslint",
  ],
  parserOptions: {
    ecmaVersion: 2020,
  },
  rules: {
    "no-console": process.env.NODE_ENV === "production" ? "warn" : "off",
    "no-debugger": process.env.NODE_ENV === "production" ? "warn" : "off",
  },
  overrides: [
    {
      files: [
        "**/__tests__/*.{j,t}s?(x)",
        "**/tests/unit/**/*.spec.{j,t}s?(x)",
      ],
      env: {
        jest: true,
      },
    },
  ],
};
tsconfig.js
{
  "compilerOptions": {
    "target": "es5",
    "module": "esnext",
    "strict": true,
    "jsx": "preserve",
    "importHelpers": true,
    "moduleResolution": "node",
    "skipLibCheck": true,
    "esModuleInterop": true,
    "allowSyntheticDefaultImports": true,
    "sourceMap": true,
    "baseUrl": ".",
    "types": [
      "webpack-env",
      "jest"
    ],
    "paths": {
      "@/*": [
        "src/*"
      ]
    },
    "lib": [
      "esnext",
      "dom",
      "dom.iterable",
      "scripthost"
    ]
  },
  "include": [
    "src/**/*.ts",
    "src/**/*.tsx",
    "src/**/*.vue",
    "tests/**/*.ts",
    "tests/**/*.tsx"
  ],
  "exclude": [
    "node_modules"
  ]
}
また、下記のテストに関するライブラリーがインストールされています。
| ライブラリー名 | 現在の最新バージョン |
|---|---|
| @types/jest | ^24.0.19 |
| @vue/cli-plugin-unit-jest | ~4.5.0 |
| @vue/test-utils | ^2.0.0-0 |
| vue-jest | ^5.0.0-0 |
テストコードの作成方法
生成されたVue CLIプロジェクトの初期状態では、
以下のコンポーネントとコンポーネントに対するテストコードが用意されています。
~/src/components/HelloWorld.vue
<template>
  <div class="hello">
    <h1>{{ msg }}</h1>
  </div>
</template>
import { defineComponent } from "vue";
export default defineComponent({
name: "HelloWorld",
props: {
msg: String,
},
});~/tests/unit/example.spec.ts
import { shallowMount } from "@vue/test-utils";
import HelloWorld from "@/components/HelloWorld.vue";

describe("HelloWorld.vue", () => {
  it("renders props.msg when passed", () => {
    const msg = "new message";
    const wrapper = shallowMount(HelloWorld, {
      props: { msg },
    });
    expect(wrapper.text()).toMatch(msg);
  });
});
HelloWorld コンポーネントでは props として msg を受け取り、h1 タグとして表示させています。
サンプルのテストコードでは props として渡したテキスト(msg)が
正しく表示されているかどうかテストしています。
shallowMount 関数を用いて HelloWorld コンポーネントを読み込み、props の msg に値を渡しています。
expect関数で描画されたテキストが props として渡した文字列と一致してるか判定します。
mount と shallowMount の違い
コンポーネントのテストを行うためにはテストコードにコンポーネントを読み込む必要があります。
テストコード内でコンポーネントをマウントし、props などの値を渡しますが、
今回使用している Vue Test Utils にはマウントできる mount 関数と shallowMount 関数の2つあり、
どちらかを使用する必要があります。
この2つの挙動の違いとしては、
子コンポーネントをそのまま描画するのが mount 関数、
子コンポーネントをスタブするのが shallowMount 関数です。
shallowMount の場合は子コンポーネントに関わらずコンポーネントをテストする事ができます。
子コンポーネントに対するテストは別のテストとして定義するのが良いでしょう。
テストの流れ
実際のテストの流れとしては、
describe 関数でテストをグループ化し、it 関数や test 関数でテストコードを実行します。
it 関数や test 関数内で、expect 関数でテストを行います。
expect(検証データ).検証方法(想定データ)
expect 関数では以下のようなものがあります。
- toBe() … 値が一致しているか
- toContain() … 配列内にあるかどうか
- toEqual() … オブジェクトインスタンス内の全てのプロパティが一致しているか
- toMatch()… 文字列が一致しているか
その他のexpect関数についてはこちら
Composition API での単体テスト方法
以下はボタンの矢印キーによって count を増減する事ができるコンポーネントです。
(それ以外のキーの場合は0になります)
~/src/components/KeyCounter.vue
<template>
  <input
    type="text"
    v-model="state.count"
    data-testid="inputCount"
    @keydown.prevent="onKeydown"
  />
</template>
import { defineComponent, reactive } from 'vue'
export default defineComponent({
setup() {
const state = reactive({
count: 0,
})
const clear = () => {
state.count = 0
}
const onKeydown = (e: KeyboardEvent) => {
switch (e.code) {
case 'ArrowUp':
state.count = state.count + 5
break;
case 'ArrowDown':
state.count = state.count - 5
break;
case 'ArrowRight':
state.count = state.count + 1
break;
case 'ArrowLeft':
state.count = state.count - 1
break;
default:
clear()
break;
}
}
return {
state,
onKeydown,
}
},
})実際の動作はこのようになります。
ロジックをコンポーネントから分離させる実装方法についてはこちらの記事で紹介しております。
この場合のコンポーネントは以下の通りになります。
~/tests/unit/keyCounter.spec.ts
import { shallowMount } from "@vue/test-utils";
import KeyCounter from "@/components/KeyCounter.vue";

describe('KeyCounter', () => {

  let wrapper: any;
  beforeEach(async () => {
    wrapper = shallowMount(KeyCounter);
  })

  // 初期化
  it('Count is zero by default', () => {
    expect(wrapper.vm.state.count).toBe(0)
  })

  it('Pressing the ArrowUp button, Count by +5', async () => {
    await wrapper.find('[data-testid="inputCount"]').trigger('keydown', { code: 'ArrowUp' });
    expect(wrapper.vm.state.count).toBe(5)
  })

  it('Pressing the ArrowDown button, Count by -5', async () => {
    await wrapper.find('[data-testid="inputCount"]').trigger('keydown', { code: 'ArrowDown' });
    expect(wrapper.vm.state.count).toBe(-5)
  })

  it('Pressing the ArrowRight button, Count by +1', async () => {
    await wrapper.find('[data-testid="inputCount"]').trigger('keydown', { code: 'ArrowRight' });
    expect(wrapper.vm.state.count).toBe(1)
  })

  it('Pressing the ArrowLeft button, Count by -1', async () => {
    await wrapper.find('[data-testid="inputCount"]').trigger('keydown', { code: 'ArrowLeft' });
    expect(wrapper.vm.state.count).toBe(-1)
  })

  it('Pressing the arrows button, Count by 0', async () => {
    wrapper.find('[data-testid="inputCount"]').trigger('keydown', { code: 'ArrowRight' });
    await wrapper.find('[data-testid="inputCount"]').trigger('keydown', { code: 'KeyA' });
    expect(wrapper.vm.state.count).toBe(0)
  })
})
describe 関数の中で複数の it 関数を呼び出してテストを行っています。
wrapper を毎回 shallowMount 関数でマウントする方法でも良いのですが、
beforeEach を利用する事でテスト毎に wrapper を初期化して shallowMount する事ができました。
これにより冗長的だった処理をひとまとめに記述する事ができます。
実際にコマンドを実行し、テストを行います。
npm run test:unit※ ファイル名を指定したい場合は以下のようにファイル名を末尾につける
npm run test:unit keyCounter.spec.tsテストが失敗した場合は以下のような出力になります。
FAIL  tests/unit/keyCounter.spec.ts
  KeyCounter
    ✓ Count is zero by default (25ms)
    ✓ Pressing the ArrowUp button, Count by +5 (11ms)
    ✓ Pressing the ArrowDown button, Count by -5 (3ms)
    ✕ Pressing the ArrowRight button, Count by +1 (5ms)
    ✓ Pressing the ArrowLeft button, Count by -1 (2ms)
    ✓ Pressing the arrows button, Count by 0 (2ms)

  ● KeyCounter › Pressing the ArrowRight button, Count by +1

    expect(received).toBe(expected) // Object.is equality

    Expected: 10
    Received: 1

      26 |   it('Pressing the ArrowRight button, Count by +1', async () => {
      27 |     await wrapper.find('[data-testid="inputCount"]').trigger('keydown', { code: 'ArrowRight' });
    > 28 |     expect(wrapper.vm.state.count).toBe(10)
         |                                    ^
      29 |   })
      30 |
      31 |   it('Pressing the ArrowLeft button, Count by -1', async () => {

      at tests/unit/keyCounter.spec.ts:28:36
      at step (node_modules/tslib/tslib.js:141:27)
      at Object.next (node_modules/tslib/tslib.js:122:57)
      at fulfilled (node_modules/tslib/tslib.js:112:62)

Test Suites: 1 failed, 1 total
Tests:       1 failed, 5 passed, 6 total
Snapshots:   0 total
Time:        3.796s
Ran all test suites matching /keyCounter.spec.ts/i.
Expected と Received の値を見比べて不具合のある箇所を見つけましょう。
Received に値が入っていない場合は find などで失敗している場合があります。
以下のような出力になればテストが通っております。
PASS  tests/unit/keyCounter.spec.ts
  KeyCounter
    ✓ Count is zero by default (15ms)
    ✓ Pressing the ArrowUp button, Count by +5 (10ms)
    ✓ Pressing the ArrowDown button, Count by -5 (3ms)
    ✓ Pressing the ArrowRight button, Count by +5 (2ms)
    ✓ Pressing the ArrowLeft button, Count by -1 (2ms)
    ✓ Pressing the arrows button, Count by 0 (2ms)

Test Suites: 1 passed, 1 total
Tests:       6 passed, 6 total
Snapshots:   0 total
Time:        2.024s, estimated 5s
Ran all test suites matching /keyCounter.spec.ts/i
まとめ
今回は Vue3 の Composition API で実装したコンポーネントの単体テスト方法について解説しました!
テストコードについては 短期的な開発だとメリットを感じづらくなりがちですが、
長期的で大規模な開発になればなるほど上記にあげたメリットを実感すると思います。
Vue3 でのフロントエンドの開発のご相談は、ぜひお気軽にお問い合わせください。
スモールスタート開発支援、サーバーレス・NoSQLのことなら
ラーゲイトまでご相談ください
低コスト、サーバーレスの
モダナイズ開発をご検討なら
 開発 をご希望の企業様
 下請け対応可能
Sler企業様からの依頼も歓迎
協業 をご希望の企業様 


ラーゲイトは、世界の最新技術を追い続ける
プロフェッショナルチームです。


