


これからブロックチェーンをはじめたいヒト必見!TypeScriptでBitCoinウォレット・ブロックチェーンノードを構築する方法をWeb3開発エキスパートが解説します😎
 2022.09.05


こんにちは!
最近ではブロックチェーン、Web3 関連の開発相談が増えてきました。ここ1年で、Dapps をはじめとした様々なブロックチェーンを活用したアプリケーションが誕生しています。
わたしたちも日々研究を重ねお客様へ AWS × Web3 の技術支援を行っていますが、本記事ではブロックチェーンの基本となるウォレットの TypeScript での作成方法を紹介しようと思います!
自社でブロックチェーンに取り組もうと考えている方は必見です^^
想定する読者
- ブロックチェーンの基本/基礎を知りたいヒト
- 自社でブロックチェーン人材を育成したいヒト
- これからブロックチェーンをはじめようと考えているヒト
はじめに
本記事が提供すること
- ブロックチェーンノードの基本的な動作概略
- ハンズオンによるブロックチェーンの開発体験
本記事のサンプルについて
本記事では、実際のブロックチェーンの動きに近いブロックチェーンノード(BTC)及びウォレット作成用サーバーをローカルで動かすことをゴールにします。
プロダクション環境で実際にブロックチェーンネットワークへデプロイ&動作させるには、各部で微調整が必要となりますのでご了承ください。(わたしたちの技術支援も可能ですので、お気軽にお問い合わせください)
また、本記事では実際にブロックチェーンネットワークへ接続するサンプルは提供しません、あくまでもブロックチェーンの仕組みの理解にフォーカスしたサンプル実装を解説いたします。
本記事で登場する主な技術用語
本記事で登場するブロックチェーン技術用語を理解しておきましょう。
| 用語 | 解説 |
| ブロックチェーン | 分散型ネットワークによる、次世代のデータの管理手法。過去の取引履歴を1本の鎖のようにつなげ、正確な取引履歴を維持しようとする技術。 |
| ブロックチェーンノード | ブロックチェーンネットワークに参加する各ノード(≒ ネットワーク参加者)のこと。 |
| P2P | 送信者と受信者で、直接通信をしてファイル(データ)を共有できる通信技術のこと。 |
| マイニング | ブロックチェーンネットワークに登録された新たな取引を、定められたハッシュ化アルゴリズムを実行し、取引を承認及び記録(ブロック生成)する行為。 アルゴリズムの実行には非常にハイスペックなハードウェアを求められ、その報酬として仮想通貨を獲得できる。 |
| マイナー | マイニングを実行するヒト。 |
| ビットコイン | 世界で初めてブロックチェーンを基盤として開発された暗号資産。 |
| イーサリアム | 分散型アプリケーション(dApps)や自動取引(スマートコントラクト)を実行するためのプラットフォーム。 同プラットフォーム内で使用される暗号資産の名称はイーサ(ETH)と呼ばれる。 イーサリアムはプラットフォームの名称、イーサは暗号資産の名称なので要注意。 |
| ハッシュ | あるデータを固定長のランダムに見える文字列に不可逆変換して置き換えること。 可逆変換とは意味が異なるので注意が必要。 |
全体の動作概略図
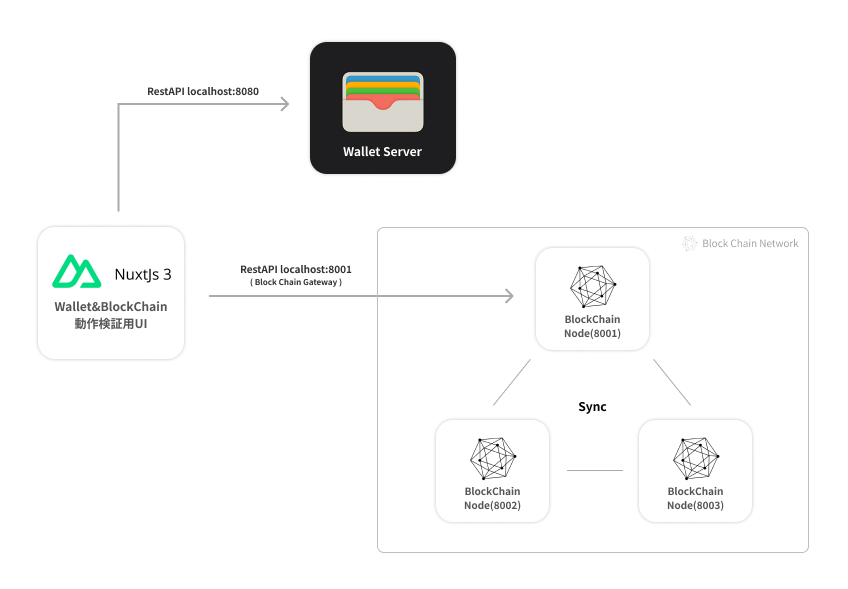
実際のプロダクション環境では、各ブロックチェーンノードは P2P 通信を行いますが、本サンプルでは擬似的にローカルで RestAPI を使用しブロックチェーンノードの通信を実現します。
ローカルに3機のブロックチェーンノード(localhost:8001~localhost:8003)を起動し、トランザクションデータやブロックチェーンを同期させます。
尚、ブロックチェーンネットワーク通信用のゲートウェイには「localhost:8001」のノードを使用し、フロントエンドからゲートウェイへ RestAPI 通信を行い、トランザクション発行、マイニング等をリクエストし実行します。
完成イメージ
ブロックチェーンノードは TypeScript と NodeJS で構築し、動作検証用の UI は Nuxt3 で実装しています。今回はわたしたちが豊富に技術ノウハウを有する技術を使用しサクッとサンプル実装を行いますが、読者の方は適宜お好きなフレームワーク・言語で実装してください。
TypeScript 環境を用意
まずは、TypeScript で実装された各ノードを実行するための TypeScript 環境を作ります。TypeScript はそのまま NodeJS では実行できませんので、通常は WebPack 等でビルドするプロセスを要しますが、本サンプルはプロダクション用ではないため、手早く ts-node モジュールを使用して NodeJS を実行します。
本サンプルで使用するパッケージ一覧
package.json ファイルを見ていきましょう。本サンプルで使用する npm モジュールを指定しています。本サンプルは NodeJS16 の環境を想定し実装しますので、お手元の NodeJS のバージョンは 16.x を指定しておいてください。(この機会に NVM をインストールしバージョンのスイッチをできるようにしておくとよろしいかと思います。)
{
  "name": "blockchain_by_typescript",
  "version": "1.0.0",
  "engines": {
    "node": "16.x >="
  },
  "scripts": {
  },
  "author": "",
  "devDependencies": {
    "@types/cors": "^2.8.12",
    "@types/crypto-js": "^4.1.1",
    "@types/eccrypto": "^1.1.3",
    "@types/encoding-japanese": "^2.0.0",
    "@types/express": "^4.17.13",
    "@types/lodash": "^4.14.183",
    "@types/moment": "^2.13.0",
    "@types/node": "^17.0.10",
    "@types/ping": "^0.4.1",
    "@types/ripemd160": "^2.0.0",
    "@types/tcp-ping": "^0.1.3",
    "ts-node": "^10.9.1",
    "tsconfig-paths": "^4.1.0",
    "typescript": "^4.5.5",
    "yargs": "^17.5.1"
  },
  "dependencies": {
    "axios": "^0.27.2",
    "body-parser": "^1.20.0",
    "bs58": "^5.0.0",
    "cors": "^2.8.5",
    "crypto": "^1.0.1",
    "dotenv": "^16.0.1",
    "eccrypto": "^1.1.6",
    "encoding-japanese": "^2.0.0",
    "express": "^4.18.1",
    "lodash": "^4.17.21",
    "moment": "^2.29.4",
    "ripemd160": "^2.0.2",
    "starkbank-ecdsa": "^1.1.4",
    "tcp-ping": "^0.1.1"
  }
}
package.json を作成したら、パッケージのインストールを忘れずに行ってください。
yarn install
# or
npm install
TypeScript のコンフィグ作成
ルートディレクトリへ、tsconfig.json を作成してください。
{
  "compilerOptions": {
    "baseUrl": "./",
    "paths": {
      "#/*": ["*"]
    },
    "target": "es2016",
    "module": "commonjs",
    "outDir": "./dist" ,
    "esModuleInterop": true ,
    "forceConsistentCasingInFileNames": true ,
    "strict": true ,
    "skipLibCheck": true /* Skip type checking all .d.ts files. */
  }
}
これで TypeScript の環境構築は完了です。
ではいよいよブロックチェーンの実装方法を見ていきます!
データベースの構築はしません
本記事ではデータベースを利用せず、各ノードでキャッシュを保持します。プロダクション環境ではデータベースは必須ですので、先々データベースの利用をイメージしながら実装してみてください。
ウォレットサーバーの構築
ウォレットサーバーで提供すること
- 秘密鍵の生成と、Hex(16進数)形式での出力
- 公開鍵の生成と、Hex(16進数)形式での出力
- ブロックチェーンアドレスの生成
では、一つずつ実装方法を追っていきましょう。
ウォレット作成
まず、最終的なソースコードを記載します。後述でソースコードを分解し解説を行います。
// src/service/WalletService.ts

import eccrypto from "eccrypto";
import crypto from "crypto";
import ripemd160 from "ripemd160";
import base58 from "bs58";

export default class {
  private _privateKey: Buffer;
  private _publicKey: Buffer;
  private _blockchainAddress: string;

  constructor() {
    this._privateKey = eccrypto.generatePrivate();
    this._publicKey = eccrypto.getPublic(this._privateKey);
    this._blockchainAddress = this.generateBlockchainAddress();
  }

  public get privateKey(): string {
    return this._privateKey.toString("hex");
  }

  public get publicKey(): string {
    return this._publicKey.toString("hex");
  }

  public get blockchainAddress(): string {
    return this._blockchainAddress;
  }

  private generateBlockchainAddress(): string {
    const publicKeySha256Hash = crypto
      .createHash("sha256")
      .update(this._publicKey)
      .digest();
    const publicKeyRipemd160Hash = new ripemd160()
      .update(publicKeySha256Hash)
      .digest();
    // Ripemd160でハッシュ化された文字列の先頭に、「00」を付与
    const step1 = Buffer.from(
      "00" + publicKeyRipemd160Hash.toString("hex"),
      "hex"
    );
    const step2 = crypto.createHash("sha256").update(step1).digest();
    const step3 = crypto.createHash("sha256").update(step2).digest();
    const checksum = step3.toString("hex").substring(0, 8);
    const step4 = step1.toString("hex") + checksum;
    const address = base58.encode(Buffer.from(step4, "hex"));
    return address;
  }
}
秘密鍵と公開鍵の生成方法
getPublic メソッドは、秘密鍵から secp256k1 アルゴリズムを使用して生成されます。ビットコインの公開鍵にはSecp256k1が採用されているため、Secp256k1 を使用して公開鍵のハッシュ文字列を作成します。
this._privateKey = eccrypto.generatePrivate();
this._publicKey = eccrypto.getPublic(this._privateKey);
Secp256k1 とは
楕円曲線と呼ばれる次の形の方程式により定義されるアルゴリズムです。
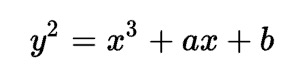
詳しく知りたい方はこちらのリンクをご覧ください。ちなみに私たちは概要程度は理解していますが、詳細に把握しているわけではないです。
今の時点では、「Secp256k1というハッシュ化のアルゴリズムが使用されている」程度の理解でよろしいかと思います。
秘密鍵と公開鍵の Hex(文字列)取得
eccrypto.generatePrivate で生成された秘密鍵と、eccrypto.getPublic で生成された公開鍵は Buffer 形式ですので、 Hex 形式に変換し取得しましょう。実装方法はとても簡単・シンプルで、それぞれワンラインで実装が可能です。
this._privateKey.toString("hex");
this._publicKey.toString("hex");
ブロックチェーンアドレスの生成
最も難解なのが、ブロックチェーンアドレスの生成です。これは、イーサリアムやビットコイン等のブロックチェーンネットワークによってルールが異なりますので注意してください。本サンプルでは簡単なビットコインの例を記述します。
ブロックチェーンアドレスの生成方法は、以下の手順となります。少々難解ですが、秘密鍵をより推測されにくい or 重複することのない文字列を生成しなければならないので、いくつか手順を踏む必要があります。
- 公開鍵を SHA256 でハッシュ化
- 1のハッシュを更に Ripemd160 でハッシュ化
- 2の Hex 文字列の先頭に「00」を付与
- 3を SHA256 で2回ハッシュ化(ダブルハッシュ)
- チェックサムの取得
- Base58 でエンコードし Hex 化 ←ブロックチェーンアドレス
// 公開鍵をsha256でハッシュ化
const publicKeySha256Hash = crypto
  .createHash("sha256")
  .update(this._publicKey)
  .digest();

// sha256でハッシュ化された公開鍵を、更にRipemd160でハッシュ化
const publicKeyRipemd160Hash = new ripemd160()
  .update(publicKeySha256Hash)
  .digest();
// Ripemd160でハッシュ化された文字列の先頭に、「00」を付与
const step1 = Buffer.from(
  "00" + publicKeyRipemd160Hash.toString("hex"),
  "hex"
);

// ダブルハッシュ
const step2 = crypto.createHash("sha256").update(step1).digest();
const step3 = crypto.createHash("sha256").update(step2).digest();

// チェックサム取得と文字列への結合
const checksum = step3.toString("hex").substring(0, 8);
const step4 = step1.toString("hex") + checksum;

// base58でエンコード
const address = base58.encode(Buffer.from(step4, "hex"));
トランザクション機能実装
ブロックチェーンネットワークへ登録するトランザクションの生成処理を実装します。トランザクションの生成には、先程作成したウォレットの秘密鍵、公開鍵によるデータへの署名が必要となります。
本サンプルでは、BitCoin の送信をイメージしトランザクションに
- 送信先ビットコインアドレス
- 送信者ビットコインアドレス
- BitCoin 送信量
- 公開鍵(hex)
- シグネチャー(署名)
の5つの情報を含めます。上記5つの情報をトランザクションに含めて送ることで、ブロックチェーンノードへ改ざんされる可能性が極めて低い、安全なトランザクションリクエストが可能となります。
// src/service/TransactionService.ts

import crypto from "crypto";
import eccrypto from "eccrypto";
import { sortedObjectByKey, convertToUtf8 } from "#/src/utils/index";

type Args = {
  senderPrivateKey: string;
  senderPublicKey: string;
  senderBlockchainAddress: string;
  recipientBlockchainAddress: string;
  value: number;
};

type Transaction = {
  sender_blockchain_address: string;
  recipient_blockchain_address: string;
  sender_public_key: string;
  value: number;
  signature: string;
};

export default class {
  private senderPrivateKey: string;
  private senderPublicKey: string;
  private senderBlockchainAddress: string;
  private recipientBlockchainAddress: string;
  private value: number;

  constructor(args: Args) {
    this.senderPrivateKey = args.senderPrivateKey;
    this.senderPublicKey = args.senderPublicKey;
    this.senderBlockchainAddress = args.senderBlockchainAddress;
    this.recipientBlockchainAddress = args.recipientBlockchainAddress;
    this.value = args.value;
  }

  public async getTransactionWithSignature(): Promise<Transaction> {
    return {
      sender_blockchain_address: this.senderBlockchainAddress,
      recipient_blockchain_address: this.recipientBlockchainAddress,
      sender_public_key: this.senderPublicKey,
      value: this.value,
      signature: await this.generateSignature(),
    };
  }

  public async generateSignature(): Promise<string> {
    const transaction = sortedObjectByKey({
      sender_blockchain_address: this.senderBlockchainAddress,
      recipient_blockchain_address: this.recipientBlockchainAddress,
      value: this.value,
    });
    const transactionStr = convertToUtf8(JSON.stringify(transaction));
    const msg = crypto.createHash("sha256").update(transactionStr).digest();
    return new Promise((resolve, reject) => {
      eccrypto
        .sign(Buffer.from(this.senderPrivateKey, "hex"), msg)
        .then((sig) => {
          eccrypto
            .verify(Buffer.from(this.senderPublicKey, "hex"), msg, sig)
            .then(function () {
              resolve(sig.toString("hex"));
            })
            .catch(function () {
              reject("Failed Signature");
            });
        });
    });
  }
}
シグネチャー(署名)の作成
以下の箇所をご覧いただくと、秘密鍵と公開鍵を使用してシグネチャーを作成しているのがわかるかと思います。秘密鍵と公開鍵には Hex の文字列を渡す想定なので、Hex 形式から Buffer を生成しています。
eccrypto
  .sign(Buffer.from(this.senderPrivateKey, "hex"), msg)
  .then((sig) => {
    eccrypto
      .verify(Buffer.from(this.senderPublicKey, "hex"), msg, sig)
      .then(function () {
        resolve(sig.toString("hex"));
      })
      .catch(function () {
        reject("Failed Signature");
      });
  });
});
ここで生成された署名は、後述でブロックチェーンノードで改ざんがないことを保証するために使用します。
ウォレットサーバーの構築と起動
では実装したウォレットの機能を実際にローカルで動作させましょう。サーバーの構築には、Express を使用します。作成する RestAPI は以下になります。
| RestAPI | 用途 |
| POST /wallet | ウォレットの作成 API |
| POST /transaction | トランザクションの作成 API |
// server/wallet_server.ts

import express, { Express, Request, Response } from "express";
import _ from "lodash";
import yargs from "yargs";
import * as ExpressTypes from "#/types/expressWalletServer";
import WalletService from "#/src/service/WalletService";
import TransactionService from "#/src/service/TransactionService";
import cors from "cors";
import bodyParser from "body-parser";

const app: Express = express();
const argv = yargs.argv as unknown as ExpressTypes.Argv;
const port = argv.port;

const jsonPrettier = <T>(v?: T): string =>
  v ? JSON.stringify(v, null, 2) : "{}";

const header = {
  contentTypeJson: "application/json; charset=utf-8",
};

app.use(bodyParser.json());
app.use(
  cors({
    origin: "http://localhost:3000",
    credentials: true,
    // optionsSuccessStatus: 200,
  })
);

app.post("/wallet", async (req: Request, res: Response) => {
  const wallet = new WalletService();
  res
    .status(201)
    .header("Content-Type", header.contentTypeJson)
    .send(
      jsonPrettier({
        private_key: wallet.privateKey,
        public_key: wallet.publicKey,
        blockchain_address: wallet.blockchainAddress,
      })
    );
});

app.post(
  "/transaction",
  (req: Request<{}, {}, ExpressTypes.PostTransactionArgs>, res: Response) => {
    const body = req.body;
    const transactionService = new TransactionService({
      senderPrivateKey: body.sender_private_key,
      senderPublicKey: body.sender_public_key,
      senderBlockchainAddress: body.sender_blockchain_address,
      recipientBlockchainAddress: body.recipient_blockchain_address,
      value: body.value,
    });
    transactionService.getTransactionWithSignature().then((data) => {
      res
        .status(201)
        .header("Content-Type", header.contentTypeJson)
        .send(jsonPrettier(data));
    });
  }
);

app.listen(port, () => {
  console.log(`Wallet server is running at http://localhost:${port}`);
});
// types/expressWalletServer.ts

export type Argv = {
  port: string;
};
export type PostTransactionArgs = {
  sender_private_key: string;
  sender_blockchain_address: string;
  recipient_blockchain_address: string;
  sender_public_key: string;
  value: number;
};
起動コマンド
package.json へ起動コマンドを追記しておきましょう。
"scripts": {
  "wallet_server": "ts-node -r tsconfig-paths/register server/wallet_server.ts --port 8080"
}
これでウォレットのサーバーは構築完了です。
次は、ブロックチェーンノードを作成します。
ブロックチェーンノードの構築
ブロックチェーンノードで提供すること
- 他のブロックチェーンノードへのトランザクションの同期
- 他のブロックチェーンノードへのブロックチェーンの同期
- 指定のブロックチェーンアドレスの保有する BitCoin を算出
- マイニング
ブロックチェーンノードの実装
まずは、最終的なソースコードを見ていきましょう。
// src/service/BlockchainService.ts

import _ from "lodash";
import moment from "moment";
import { sortedObjectByKey, convertToUtf8 } from "#/src/utils/index";
import { Transaction, Block } from "#/src/types/blockchain";
import eccrypto from "eccrypto";
import crypto from "crypto";
import ping from "tcp-ping";
import axios from "axios";

const NEIGHBOR_PORT: number[] = _.times(3, (i) => 8001 + i);

export default class {
  private _transactions: Transaction[] = [];
  private _chain: Block[] = [];
  private _blockchainAddress?: string = undefined;
  private _neighbors: string[] = [];
  private _neighborHost?: string;
  private _port?: number = undefined;

  public get port(): number | undefined {
    return this._port;
  }

  public set port(value: number | undefined) {
    this._port = value;
  }

  public get neighborHost(): string | undefined {
    return this._neighborHost;
  }

  public set neighborHost(value: string | undefined) {
    this._neighborHost = value;
  }

  public get blockchainAddress(): string | undefined {
    return this._blockchainAddress;
  }

  public set blockchainAddress(value: string | undefined) {
    this._blockchainAddress = value;
  }

  public get neighbors(): string[] {
    return this._neighbors;
  }

  public set neighbors(value: string[]) {
    this._neighbors = value;
  }

  public get chain(): Block[] {
    return this._chain;
  }

  public set chain(value: Block[]) {
    this._chain = value;
  }

  public get transactions(): Transaction[] {
    return this._transactions;
  }

  public set transactions(value: Transaction[]) {
    this._transactions = value;
  }

  constructor(args: { blockchainAddress?: string; port?: number }) {
    if (_.isEmpty(process.env.MINING_DIFFICULTY))
      throw new Error("process.env.MINING_DIFFICULTY is Empty");
    if (_.isEmpty(process.env.MINING_SENDER))
      throw new Error("process.env.MINING_SENDER is Empty");
    if (_.isEmpty(process.env.MINING_REWARD))
      throw new Error("process.env.MINING_REWARD is Empty");
    this._blockchainAddress = args.blockchainAddress;
    this.port = args.port;
    // ブロックチェーンネットワークの初期ブロックを生成
    this.createBlock(0, this.hash({}));
    this.neighborHost = process.env.NEIGHBOR_HOST as string;
  }

  public async init() {
    await this.syncNeighbors();
    await this.resolveConflict();
  }

  public async resolveConflict(): Promise<boolean> {
    const chains = (await Promise.all(
      this.neighbors.map((h) =>
        axios.get(`http://${h}/chain`).then(({ data }) => data)
      )
    )) as Block[][];
    let longestChain: Block[] = this.chain;
    let maxChainLength: number = _.size(this.chain);
    chains.forEach((chain) => {
      const theChainLength: number = _.size(chain);
      if (theChainLength > maxChainLength && this.validChain(chain)) {
        maxChainLength = theChainLength;
        longestChain = chain;
      }
    });
    if (_.difference(longestChain, this.chain).length > 0) {
      this.chain = longestChain;
      console.log("Replaced block chain", JSON.stringify(this.chain, null, 2));
      return true;
    }
    return false;
  }

  public async createTransaction(args: {
    senderBlockchainAddress: string;
    recipientBlockchainAddress: string;
    value: number;
    senderPublicKey?: string;
    signature?: string;
  }): Promise<boolean> {
    const {
      senderBlockchainAddress,
      recipientBlockchainAddress,
      value,
      senderPublicKey,
      signature,
    } = args;
    const isAdded = await this.addTransaction({
      senderBlockchainAddress,
      recipientBlockchainAddress,
      value,
      senderPublicKey,
      signature,
    });
    if (!isAdded) return false;
    // 他のブロックチェーンノードへ同期
    await Promise.all(
      this.neighbors.map((h) =>
        axios.put(`http://${h}/transaction`, {
          sender_blockchain_address: senderBlockchainAddress,
          recipient_blockchain_address: recipientBlockchainAddress,
          value: value,
          sender_public_key: senderPublicKey,
          signature: signature,
        })
      )
    );
    return true;
  }

  public async addTransaction(args: {
    senderBlockchainAddress: string;
    recipientBlockchainAddress: string;
    value: number;
    senderPublicKey?: string;
    signature?: string;
  }): Promise<boolean> {
    const {
      senderBlockchainAddress,
      recipientBlockchainAddress,
      value,
      senderPublicKey,
      signature,
    } = args;
    const transaction: Transaction = sortedObjectByKey({
      sender_blockchain_address: senderBlockchainAddress,
      recipient_blockchain_address: recipientBlockchainAddress,
      value: value,
    });
    // マイニングの報酬の場合は後続の検証処理を実施しない
    if (senderBlockchainAddress === process.env.MINING_SENDER) {
      this._transactions.push(transaction);
      return true;
    }
    const transactionStr = convertToUtf8(JSON.stringify(transaction));
    if (
      await this.verifyTransactionSignature({
        signature: signature as string,
        transaction: transactionStr as string,
        senderPublicKey: senderPublicKey as string,
      })
    ) {
      this._transactions.push(transaction);
      return true;
    }
    return false;
  }

  public async mining(): Promise<boolean> {
    // 本番のBitCoinネットワークの場合はトランザクションが存在しない場合でもマイニングが実行される
    // ただ、BitCoinネットワークでトランザクションが存在しない可能性は極めて低いので、基本的には実行される
    // 本環境は検証用のため、トランザクションが存在しない場合はマイニングを中止する(Chainを見やすくするために)
    if (
      // _.isEmpty(this.transactions) ||
      _.isEmpty(this.blockchainAddress) ||
      _.isEmpty(this._chain)
    ) {
      return false;
    }
    if (
      !(await this.addTransaction({
        senderBlockchainAddress: process.env.MINING_SENDER as string,
        recipientBlockchainAddress: this.blockchainAddress as string,
        value: _.toInteger(process.env.MINING_REWARD),
      }))
    ) {
      return false;
    }
    const nonce = this.proofOfWork();
    const previousHash = this.hash(_.last(this._chain) as Block);
    await this.createBlock(nonce, previousHash);
    await Promise.all(
      this.neighbors.map((h) => axios.put(`http://${h}/consensus`))
    );
    return true;
  }

  public calculateTotalAmount(blockchainAddress: string): number {
    let totalAmount = 0.0;
    this._chain.forEach((block) => {
      block.transactions.forEach((transaction) => {
        const value = _.toNumber(transaction["value"]);
        if (blockchainAddress == transaction["recipient_blockchain_address"])
          totalAmount += value;
        if (blockchainAddress == transaction["sender_blockchain_address"])
          totalAmount -= value;
      });
    });
    return totalAmount;
  }

  public async syncNeighbors() {
    const isAvailable = (port: number): Promise<boolean> =>
      new Promise((resolve) => {
        ping.probe(this.neighborHost as string, port, (err, data) => {
          if (err) resolve(false);
          else resolve(data);
        });
      });
    const neighbors: string[] = [];
    for (const port of NEIGHBOR_PORT) {
      if (this.port !== port && (await isAvailable(port))) {
        neighbors.push(`${this.neighborHost}:${port}`);
      }
    }
    const addedNode: string[] = _.difference(this.neighbors, neighbors);
    const removedNode: string[] = _.difference(neighbors, this.neighbors);
    if (addedNode.length > 0) console.log("ノード削除を検出", addedNode);
    else if (removedNode.length > 0)
      console.log("ノード追加を検出", removedNode);
    this.neighbors = neighbors;
  }

  private async createBlock(
    nonce: number,
    previousHash: string
  ): Promise<Block> {
    const block: Block = sortedObjectByKey({
      timestamp: moment().unix(),
      transactions: this._transactions,
      nonce: nonce,
      previous_hash: previousHash,
    });
    this._chain.push(block);
    this._transactions = [];
    // 他のブロックチェーンノードへ同期
    await Promise.all(
      this.neighbors.map((h) => axios.delete(`http://${h}/transaction`))
    );
    return block;
  }

  private proofOfWork(): number {
    if (_.isEmpty(this._chain)) throw new Error("this._chain is Empty");
    const transactions: Transaction[] = _.cloneDeep(this._transactions);
    const previousHash: string = this.hash(_.last(this._chain) as Block);
    let nonce: number = 0;
    while (!this.validProof({ transactions, previousHash, nonce })) {
      nonce += 1;
    }
    return nonce;
  }

  private validProof(args: {
    transactions: Transaction[];
    previousHash: string;
    nonce: number;
    difficulty?: number;
  }) {
    const guessBlock = sortedObjectByKey({
      transactions: args.transactions,
      nonce: args.nonce,
      previous_hash: args.previousHash,
    });
    const guessHash: string = this.hash(guessBlock);
    const difficulty: number =
      args.difficulty || _.toInteger(process.env.MINING_DIFFICULTY);
    const ansower: string = _.times(difficulty, () => "0").join("");
    return _.chain(guessHash)
      .cloneDeep()
      .thru((v) => v.slice(0, difficulty))
      .thru((v) => v === ansower)
      .value();
  }

  private verifyTransactionSignature(args: {
    signature: string;
    transaction: string;
    senderPublicKey: string;
  }): Promise<boolean> {
    const signature = Buffer.from(
      convertToUtf8(args.signature) as string,
      "hex"
    );
    const transaction = Buffer.from(
      convertToUtf8(args.transaction) as string,
      "utf-8"
    );
    const senderPublicKey = Buffer.from(
      convertToUtf8(args.senderPublicKey) as string,
      "hex"
    );
    const msg = crypto.createHash("sha256").update(transaction).digest();
    return new Promise((resolve) => {
      eccrypto
        .verify(senderPublicKey, msg, signature)
        .then(() => {
          resolve(true);
        })
        .catch(() => {
          resolve(false);
        });
    });
  }

  private validChain(chain: Block[]): boolean {
    let preBlock = chain[0];
    let currentIndex = 1;
    const chainLength = _.size(chain);
    while (currentIndex < chainLength) {
      const theBlock = chain[currentIndex];
      if (!theBlock) return false;
      if (theBlock.previous_hash !== this.hash(preBlock)) {
        return false;
      }
      if (
        !this.validProof({
          transactions: theBlock.transactions,
          previousHash: theBlock.previous_hash,
          nonce: theBlock.nonce,
        })
      ) {
        return false;
      }
      preBlock = theBlock;
      currentIndex++;
    }
    return true;
  }

  private hash(block: Record<string, unknown>): string {
    const blockStr = convertToUtf8(JSON.stringify(sortedObjectByKey(block)));
    const msg = crypto.createHash("sha256").update(blockStr).digest();
    return msg.toString("hex");
  }
}
// .env
MINING_DIFFICULTY=3
MINING_SENDER='THE BLOCKCHAIN NETWORK ADDRESS'
MINING_REWARD=1.0
NEIGHBOR_HOST='localhost'Express サーバーのソースコードは、以下になります。後述でこちらも解説します。
// server/blockchain_server.ts

import express, { Express, Request, Response } from "express";
import dotenv from "dotenv";
import _ from "lodash";
import yargs from "yargs";
import moment from "moment";
import * as ExpressTypes from "#/types/expressBlockChainServer";
import BlockchainService from "#/src/service/blockchainService";
import WalletService from "#/src/service/WalletService";
import cors from "cors";
import bodyParser from "body-parser";

dotenv.config();

const cached: {
  blockchain?: BlockchainService;
  timer?: NodeJS.Timer;
  isRunningMining: boolean;
} = { isRunningMining: false };

const app: Express = express();
const argv = yargs.argv as unknown as ExpressTypes.Argv;
const port = argv.port;

const jsonPrettier = <T>(v?: T): string =>
  v ? JSON.stringify(v, null, 2) : "{}";

const header = {
  contentTypeJson: "application/json; charset=utf-8",
};

app.use(bodyParser.json());
app.use(
  cors({
    origin: "http://localhost:3000",
    credentials: true,
    // optionsSuccessStatus: 200,
  })
);

app.get("/transactions", (req: Request, res: Response) => {
  res
    .status(200)
    .header("Content-Type", header.contentTypeJson)
    .send(jsonPrettier(cached.blockchain?.transactions));
});

app.get("/chain", (req: Request, res: Response) => {
  res
    .status(200)
    .header("Content-Type", header.contentTypeJson)
    .send(jsonPrettier(cached.blockchain?.chain));
});

app.get("/blockchainAddress", (req: Request, res: Response) => {
  res
    .status(200)
    .header("Content-Type", header.contentTypeJson)
    .send(
      jsonPrettier({
        blockchainAddress: cached.blockchain?.blockchainAddress,
      })
    );
});

app.get(
  "/sum_bitcoin/:the_block_chain_address",
  (req: Request<{ the_block_chain_address: string }>, res: Response) => {
    res
      .status(200)
      .header("Content-Type", header.contentTypeJson)
      .send(
        jsonPrettier({
          amount: cached.blockchain?.calculateTotalAmount(
            req.params.the_block_chain_address
          ),
        })
      );
  }
);

app.post(
  "/transaction",
  async (
    req: Request<{}, {}, ExpressTypes.PostTransactionArgs>,
    res: Response
  ) => {
    const isAdded = await cached.blockchain?.createTransaction({
      senderBlockchainAddress: req.body.sender_blockchain_address,
      recipientBlockchainAddress: req.body.recipient_blockchain_address,
      value: req.body.value,
      senderPublicKey: req.body.sender_public_key,
      signature: req.body.signature,
    });
    res
      .status(isAdded ? 201 : 500)
      .header("Content-Type", header.contentTypeJson)
      .send(
        jsonPrettier({
          result: isAdded ? "success" : "fail",
        })
      );
  }
);

app.put(
  "/transaction",
  async (
    req: Request<{}, {}, ExpressTypes.PostTransactionArgs>,
    res: Response
  ) => {
    const isAdded = await cached.blockchain?.addTransaction({
      senderBlockchainAddress: req.body.sender_blockchain_address,
      recipientBlockchainAddress: req.body.recipient_blockchain_address,
      value: req.body.value,
      senderPublicKey: req.body.sender_public_key,
      signature: req.body.signature,
    });
    res
      .status(isAdded ? 201 : 500)
      .header("Content-Type", header.contentTypeJson)
      .send(
        jsonPrettier({
          result: isAdded ? "success" : "fail",
        })
      );
  }
);

app.delete(
  "/transaction",
  async (
    req: Request<{}, {}, ExpressTypes.PostTransactionArgs>,
    res: Response
  ) => {
    cached!.blockchain!.transactions = [];
    res
      .status(200)
      .header("Content-Type", header.contentTypeJson)
      .send(
        jsonPrettier({
          result: "success",
        })
      );
  }
);

app.post("/mining", async (req: Request, res: Response) => {
  if (!cached.isRunningMining) {
    console.log(
      `================ Start mining at ${moment().format(
        "yyyy年MM月DD日 HH時mm分ss秒"
      )} ================ `
    );
    cached.isRunningMining = true;
    const isSuccess = await cached.blockchain?.mining();
    console.log(JSON.stringify(cached.blockchain?.chain, null, 2));
    cached.isRunningMining = false;
    console.log(
      `================ Finised mining at ${moment().format(
        "yyyy年MM月DD日 HH時mm分ss秒"
      )} ================`
    );
    res
      .status(isSuccess ? 200 : 500)
      .header("Content-Type", header.contentTypeJson)
      .send(
        jsonPrettier({
          result: isSuccess ? "success" : "fail",
        })
      );
  } else {
    res
      .status(400)
      .header("Content-Type", header.contentTypeJson)
      .send(
        jsonPrettier({
          result: "fail",
          detail: "Mining is running",
        })
      );
  }
});

app.put("/consensus", async (req: Request, res: Response) => {
  const replaced = await cached!.blockchain?.resolveConflict();
  res
    .status(200)
    .header("Content-Type", header.contentTypeJson)
    .send(
      jsonPrettier({
        result: replaced ? "Replaced" : "Not replaced",
      })
    );
});

app.listen(port, () => {
  const wallet = new WalletService();

  cached.blockchain = new BlockchainService({
    blockchainAddress: wallet.blockchainAddress,
    port: _.toInteger(port),
  });

  cached.blockchain.init();

  cached.timer = setInterval(() => {
    cached.blockchain?.syncNeighbors();
  }, 3000);

  console.log(`BlockChain node is running at http://localhost:${port}`);
});
// types/expressBlockChainServer.ts

export type Argv = {
  port: string;
};

export type PostTransactionArgs = {
  sender_blockchain_address: string;
  recipient_blockchain_address: string;
  signature: string;
  sender_public_key: string;
  value: number;
};
ブロックが生成されるまでの流れ
ブロックチェーンでは、複数の取引記録(トランザクション)を一つのブロックで管理します。ブロックの生成には、マイニングと呼ばれる処理による nonce 値の算出が必要となります。
以下はブロックとトランザクションの TypeScript 型定義です。
export type Transaction = {
  sender_blockchain_address: string;
  recipient_blockchain_address: string;
  value: number;
};

export type Block = {
  timestamp: number;
  transactions: Transaction[];
  nonce: number;
  previous_hash: string;
};
ブロックの型定義の nonce という値に注目してください。
nonce 値とは、ブロックに対してある法則に従いハッシュ化のアルゴリズムを実行することで生成される値で、マイニングとはこの nonce 値を求める行為になります。nonce 値は生成されるブロックチェーンネットワークの規模に比例して算出難易度が上がります。
以下はブロックが生成されるまでのワークフローです。
- トランザクションがトランザクションプールに追加される
- マイニングを実行し、nonce 値を算出
- 算出した nonce 値と、トランザクションプールのブロックを含めた次のブロックを生成
- ブロックをブロックチェーンへ追加
ここでポイントなのが、マイニングは早い物勝ちということです。マイニングした結果報酬として BTC を受け取ることができますが、最も早く nonce 値を導き出したマイナーが報酬を手にします。
余談ですが、以前はマイニングに家庭用コンピューターでも参加できましたが、現在はハイスペックな機器を擁する企業が参加しているため、家庭用コンピューターでのマイニング参加は現実的ではなくなりました。(電気代も凄まじくかかります)ただ、BTC、ETH では勝ち目が有りませんが、ライバルの少ない草コイン(新興コイン)であれば家庭用コンピューターでも対抗できるかもしれませんね。
それでは、ソースコードを分解して解説します。
トランザクションの追加
ブロックチェーンノードへのトランザクション追加は、 addTransaction 関数で行います。ブロックチェーンノードへのトランザクション追加処理で重要なのは、署名の検証を行うということです。署名は先程 src/service/TransactionService.ts で生成した署名の検証となります。
トランザクション検証時は、トランザクションのオブジェクトを JSON.stringfy(オブジェクト文字列化関数)で文字列にし、UTF8 の文字列へ変換してから行います。詳しい実装方法は、 verifyTransactionSignature 関数を確認しましょう。
// verifyTransactionSignature関数
const signature = Buffer.from(
  convertToUtf8(args.signature) as string,
  "hex"
);
const transaction = Buffer.from(
  convertToUtf8(args.transaction) as string,
  "utf-8"
);
const senderPublicKey = Buffer.from(
  convertToUtf8(args.senderPublicKey) as string,
  "hex"
);
const msg = crypto.createHash("sha256").update(transaction).digest();
return new Promise((resolve) => {
  eccrypto
    .verify(senderPublicKey, msg, signature)
    .then(() => {
      resolve(true);
    })
    .catch(() => {
      resolve(false);
    });
});
尚、トランザクション追加時、マイナーへの報酬支払のトランザクションは、署名が含まれないので検証を行わないという点に注意しましょう。署名はあくまでもユーザーが秘密鍵と公開鍵を使用して第三者がデータを改ざんしないことを保証するために行う行為となり、マイナーへの報酬はブロックチェーンネットワークが送信者となるため、トランザクションの署名及び検証が必要ありません。(改ざんされる可能性がないということ)
// マイナーへの報酬の場合、検証処理を実施しない
if (senderBlockchainAddress === process.env.MINING_SENDER) {
  this._transactions.push(transaction);
  return true;
}
マイニングの実行
マイニングは、mining 関数で実行されます。前述で解説しました nonce 値の算出は、proofOfWork 関数及び validProof 関数 で実行します。具体的なロジックは関数を確認してください。
// proofOfWork関数
const transactions: Transaction[] = _.cloneDeep(this._transactions);
const previousHash: string = this.hash(_.last(this._chain) as Block);
let nonce: number = 0;
while (!this.validProof({ transactions, previousHash, nonce })) {
  nonce += 1;
}

// validProof関数
const guessBlock = sortedObjectByKey({
  transactions: args.transactions,
  nonce: args.nonce,
  previous_hash: args.previousHash,
});
const guessHash: string = this.hash(guessBlock);
const difficulty: number =
  args.difficulty || _.toInteger(process.env.MINING_DIFFICULTY);
const ansower: string = _.times(difficulty, () => "0").join("");
return _.chain(guessHash)
  .cloneDeep()
  .thru((v) => v.slice(0, difficulty))
  .thru((v) => v === ansower)
  .value();
この proofOfWork 関数及び guessBlock 関数の実行が、マイニングに時間がかかる理由です。nonce 値を求めるために、 while 構文で処理を繰り返しているのが分かります。
擬似的に difficulty(難易度)という変数を用意しマイニング負荷を調整できるようにしておりますので、環境変数「MINING_DIFFICULTY」を変更してみてください。
# .env
MINING_DIFFICULTY=3
ブロックチェーンノードの検出
本サンプルではブロックチェーンノードがポート8001〜8003の合計3機存在します。それぞれがトランザクションやブロックチェーンを同期し合うために、お互いを検出する必要があります。本サンプルでは以下のように同期処理を施しています。
- Express の起動時に、setInterval 関数により3秒間隔で他のノードを検出
- 検出は TCP-IP でパケット送信して行う
具体的なノードの検出処理は以下となります。tcp-ping を使用して ping を送信していますね。
// syncNeighbors
const isAvailable = (port: number): Promise<boolean> =>
  new Promise((resolve) => {
    ping.probe(this.neighborHost as string, port, (err, data) => {
      if (err) resolve(false);
      else resolve(data);
    });
  });
const neighbors: string[] = [];
for (const port of NEIGHBOR_PORT) {
  if (this.port !== port && (await isAvailable(port))) {
    neighbors.push(`${this.neighborHost}:${port}`);
  }
}
const addedNode: string[] = _.difference(this.neighbors, neighbors);
const removedNode: string[] = _.difference(neighbors, this.neighbors);
if (addedNode.length > 0) console.log("ノード削除を検出", addedNode);
else if (removedNode.length > 0) console.log("ノード追加を検出", removedNode);
this.neighbors = neighbors;
ブロックチェーンノードへのトランザクション同期
ブロックチェーンノードへトランザクションが追加された時に、他のノードへトランザクション追加します。createTransaction 関数を見てみましょう。
const isAdded = await this.addTransaction({
  senderBlockchainAddress,
  recipientBlockchainAddress,
  value,
  senderPublicKey,
  signature,
});
if (!isAdded) return false;
// 他のブロックチェーンノードへ同期
await Promise.all(
  this.neighbors.map((h) =>
    axios.put(`http://${h}/transaction`, {
      sender_blockchain_address: senderBlockchainAddress,
      recipient_blockchain_address: recipientBlockchainAddress,
      value: value,
      sender_public_key: senderPublicKey,
      signature: signature,
    })
  )
);
ブロックチェーンノード(ゲートウェイ)へトランザクション追加が成功したとき、他のノードへトランザクションを追加しているのが分かります。実際は、P2P 通信を使用して同期を行っていますが、本サンプルでは RestAPI で同期を行っています。
本サンプルでは、createTransaction 関数は POST /transaction で実行され、addTransaction 関数は PUT /transaction から実行されます。それぞれ、異なる意図で実装されているのに注意しましょう。
ブロックチェーンノードへのブロックチェーン同期
ブロックチェーンの同期は、resolveConflict 関数にて行います。ブロックチェーンの同期で重要なポイントは以下となります。
- 最も長く、正しい nonce 値を保有するチェーンを同期する
- 同期する際に、過去のブロックの nonce 値の検証を行う
実装内容を見ると、他のノードのブロックチェーンを取得し、最も長いブロックチェーンかつ、nonce 値の正しいものを同期しているのがわかるかと思います。
// resolveConflict
const chains = (await Promise.all(
  this.neighbors.map((h) =>
    axios.get(`http://${h}/chain`).then(({ data }) => data)
  )
)) as Block[][];
let longestChain: Block[] = this.chain;
let maxChainLength: number = _.size(this.chain);
chains.forEach((chain) => {
  const theChainLength: number = _.size(chain);
  if (theChainLength > maxChainLength && this.validChain(chain)) {
    maxChainLength = theChainLength;
    longestChain = chain;
  }
});
尚、「いつのタイミングで同期するのか」ですが、ブロックチェーンが追加された際に PUT / consensusAPI を実行し他のノードへ同期指示を出しているのが分かります。つまり、マイニング成功時に、他のノードへ同期を行います。
// mining関数
await Promise.all(
  this.neighbors.map((h) => axios.put(`http://${h}/consensus`))
);
ブロックチェーンサーバーが提供する API 一覧
| RestAPI | 用途 |
| GET /transactions | ブロックチェーンノードのトランザクションの取得 |
| GET /chain | ブロックチェーンノードのブロックチェーンの取得 |
| GET /blockchainAddress | ブロックチェーンノードのブロックチェーンアドレス取得 |
| GET /sum_bitcoin/:the_block_chain_address | 指定ビットコインアドレスの保有 BitCoin 算出 |
| POST /transaction | トランザクションの作成 |
| PUT /transaction | トランザクションの同期 |
| DELETE /transaction | トランザクションの削除 |
| POST /mining | マイニング実行 |
| PUT /consensus | 他のノードの同期実行指示 最もブロックチェーンの長いノードからブロックチェーンを取得 |
ブロックチェーンノードの起動
ブロックチェーンノードを3台用意したいので、各ポートごとにコマンドを用意します。
// package.json
"scripts": {
  "blockchain_server:8001": "ts-node -r tsconfig-paths/register server/blockchain_server.ts --port 8001",
  "blockchain_server:8002": "ts-node -r tsconfig-paths/register server/blockchain_server.ts --port 8002",
  "blockchain_server:8003": "ts-node -r tsconfig-paths/register server/blockchain_server.ts --port 8003"
}
package.json に上記のようにコマンドを定義しておくことで、VSCode 等のエディターでショートカットで起動コマンドを呼び出せるようになります。
便利なので上記を追記しておきましょう!
動作検証用 UI
構築したブロックチェーンノード、ウォレットサーバーと接続して動作確認を行うフロントエンドを実装します。
Nuxt3 を使用したブロックチェーンウォレットの作成
Nuxt3 で簡易的なウォレットの作成から、本サンプルでは便宜上、各種ブロックチェーンノードの状態を可視化する機能も実装しようと思います。(各ノードのトランザクション、ブロックチェーンを取得し表示)
Nuxt3 プロジェクトの作成方法
Nuxt3 では便利なプロジェクト作成コマンドが提供されています。以下のコマンドを実行し Nuxt3 のプロジェクトを作成しましょう。
npx nuxi init nuxt-app
# or
pnpm dlx nuxi init nuxt-app
Nuxt3 の雛形が作成されるかと思います。
Nuxt3 の実装
先ほど作成した Nuxt3 のプロジェクトに、追加・編集したファイルを紹介します。本サンプルでは、シンプルに解説することを目的に、Component の作成や Store の作成は行いません。シンプルに一つの vue ファイルへ処理を記述します。
尚、本サンプルでは画面を見やすくするために、Vuetify を使用します。
パッケージのインストール
本サンプルで使用するパッケージをインストールしましょう。
{
  "private": true,
  "engines": {
    "node": "16.x >="
  },
  "scripts": {
    "build": "nuxt build",
    "dev": "nuxt dev",
    "generate": "nuxt generate",
    "preview": "nuxt preview"
  },
  "devDependencies": {
    "nuxt": "3.0.0-rc.8"
  },
  "dependencies": {
    "axios": "^0.27.2",
    "lodash": "^4.17.21",
    "mdi": "^2.2.43",
    "sass": "^1.51.0",
    "vuetify": "^3.0.0-beta.1"
  }
}
プラグイン作成
プラグインを使用し、Vuetify を導入します。Nuxt3 では、plugins フォルダーにファイルを設定するだけで、プラグインの作成が可能です。
// plugins/vuetify.ts

import { createVuetify } from "vuetify";
import * as components from "vuetify/components";
import * as directives from "vuetify/directives";

export default defineNuxtPlugin((nuxtApp) => {
  const vuetify = createVuetify({
    components,
    directives,
  });
  nuxtApp.vueApp.use(vuetify);
});
nuxt.config.ts
Nuxt3 の設定を本サンプルに合わせて調整しましょう。Nuxt3 では、runtimeConfig に SPA 及び SSR 時に参照可能な環境変数を定義することができます。本サンプルでは、ゲートウェイとなるブロックチェーンノードのホスト情報と、ウォレットサーバーのホスト情報を環境変数へ格納します。
import { defineNuxtConfig } from "nuxt";

// https://v3.nuxtjs.org/api/configuration/nuxt.config
export default defineNuxtConfig({
  css: ["vuetify/lib/styles/main.sass", "mdi/css/materialdesignicons.min.css"],
  build: {
    transpile: ["vuetify"],
  },
  vite: {
    define: {
      "process.env.DEBUG": false,
    },
  },
  runtimeConfig: {
    public: {
      WALLET_SERVER_END_POINT: "http://localhost:8080",
      BLOCK_CHAIN_SERVER_HOST: "http://localhost",
    },
  },
});
Vue ファイルの実装
本サンプルでは、pages/index.vue に全ての処理を記述します。お好みで Component に分けるなどを適宜行ってください。
// pages/index.vue
<script lang="ts" setup>
import axios from "axios";
import _ from "lodash";

const snackbar = ref(false);
const config = useRuntimeConfig();
const walletEndPoint = config.public.WALLET_SERVER_END_POINT;
const blockChainHost = config.public.BLOCK_CHAIN_SERVER_HOST;
const blockChainGateway = `${config.public.BLOCK_CHAIN_SERVER_HOST}:8001`;

// ========== Wallet ==========
type Wallet = {
  private_key: string;
  public_key: string;
  blockchain_address: string;
};
const { data: wallet } = await useAsyncData<Wallet>("postWallet", async () => {
  const res = await axios.post(`${walletEndPoint}/wallet`);
  return res.data as Wallet;
});
const walletAmount = ref(0);
const isFetchWalletAmount = ref(true);
const fetchWalletAmount = async () => {
  isFetchWalletAmount.value = true;
  const res = await axios.get(
    `${blockChainGateway}/sum_bitcoin/${wallet.value.blockchain_address}`
  );
  walletAmount.value = _.toNumber(res.data.amount);
  isFetchWalletAmount.value = false;
};

// ========== Send BitCoin ==========
type TheTransaction = {
  sender_blockchain_address: string;
  recipient_blockchain_address: string;
  sender_public_key: string;
  value: number;
  signature: string;
};
const inputRecipientBlockchainAddress = ref<string>();
const inputSendBitCoinAmount = ref<number>();
const isSendBitCoin = ref(false);
const onClickSendBitCoin = async () => {
  if (!inputRecipientBlockchainAddress.value || !inputSendBitCoinAmount.value) {
    return;
  }
  isSendBitCoin.value = true;
  const theTransaction = (
    await axios.post(`${walletEndPoint}/transaction`, {
      sender_private_key: wallet.value.private_key,
      sender_blockchain_address: wallet.value.blockchain_address,
      recipient_blockchain_address: inputRecipientBlockchainAddress.value,
      sender_public_key: wallet.value.public_key,
      value: inputSendBitCoinAmount.value,
    })
  ).data as TheTransaction;
  await axios.post(`${blockChainGateway}/transaction`, {
    sender_blockchain_address: wallet.value.blockchain_address,
    recipient_blockchain_address: inputRecipientBlockchainAddress.value,
    sender_public_key: wallet.value.public_key,
    signature: theTransaction.signature,
    value: inputSendBitCoinAmount.value,
  });
  inputRecipientBlockchainAddress.value = undefined;
  inputSendBitCoinAmount.value = undefined;
  snackbar.value = true;
  isSendBitCoin.value = false;
};

// ========== BitCoinNetwork ==========
type BitcoinNetwork = {
  [key in number]: {
    chain: string;
    transactions: string;
  };
};
const fetchBitcoinNetwork = async (): Promise<BitcoinNetwork> => {
  return {
    8001: {
      chain: JSON.stringify(
        (await axios.get(`${blockChainHost}:8001/chain`)).data,
        null,
        2
      ),
      transactions: JSON.stringify(
        (await axios.get(`${blockChainHost}:8001/transactions`)).data,
        null,
        2
      ),
    },
    8002: {
      chain: JSON.stringify(
        (await axios.get(`${blockChainHost}:8002/chain`)).data,
        null,
        2
      ),
      transactions: JSON.stringify(
        (await axios.get(`${blockChainHost}:8002/transactions`)).data,
        null,
        2
      ),
    },
    8003: {
      chain: JSON.stringify(
        (await axios.get(`${blockChainHost}:8003/chain`)).data,
        null,
        2
      ),
      transactions: JSON.stringify(
        (await axios.get(`${blockChainHost}:8003/transactions`)).data,
        null,
        2
      ),
    },
  } as BitcoinNetwork;
};

const { data: bitcoinNetwork } = await useAsyncData<BitcoinNetwork>(
  "fetchBitcoinNetwork",
  async () => fetchBitcoinNetwork()
);
const onClickFetchBitCoinNetwork = async () => {
  bitcoinNetwork.value = await fetchBitcoinNetwork();
};
const miningLoading = ref({
  8001: false,
  8002: false,
  8003: false,
});
const onClickMining = async (port: 8001 | 8002 | 8003) => {
  if (miningLoading.value[port]) return;
  miningLoading.value[port] = true;
  await axios.post(`${blockChainHost}:${port}/mining`);
  miningLoading.value[port] = false;
};

onMounted(() => {
  fetchWalletAmount();
});
</script>
<!-- pages/index.vue -->
<template>
<Title>Wallet</Title>
<v-container class="container">
<v-row>
<!-- Wallet -->
<v-col cols="6">
<v-card class="pa-8">
<v-row>
<v-col cols="12">
<h1>Wallet</h1>
</v-col>
<v-col cols="12">
<v-btn :loading="isFetchWalletAmount" @click="fetchWalletAmount">
{{ walletAmount }} bit
</v-btn>
</v-col>
<v-col cols="12">
<v-textarea
label="Public Key"
rows="4"
v-model="wallet.public_key"
></v-textarea>
<v-text-field
label="Private Key"
v-model="wallet.private_key"
></v-text-field>
<v-text-field
label="Blockchain Address"
v-model="wallet.blockchain_address"
></v-text-field>
</v-col>
</v-row>
</v-card>
</v-col>
<!-- Send BitCoin -->
<v-col cols="6">
<v-card class="pa-8">
<v-row>
<v-col cols="12">
<h1>Send BitCoin</h1>
</v-col>
<v-col cols="12">
<v-text-field
label="recipient blockchain address"
v-model="inputRecipientBlockchainAddress"
></v-text-field>
<v-text-field
label="Amount"
v-model="inputSendBitCoinAmount"
></v-text-field>
<v-btn
color="primary"
:loading="isSendBitCoin"
@click="onClickSendBitCoin"
>
Send
</v-btn>
</v-col>
</v-row>
</v-card>
</v-col>
<!-- BitCoinNetwork -->
<v-col cols="12">
<v-row>
<v-col cols="12">
<h1>BitCoin Network</h1>
</v-col>
<v-col cols="12">
<v-btn color="primary" @click="onClickFetchBitCoinNetwork">
Fetch All
</v-btn>
<v-btn
color="warning"
class="ml-4"
@click="onClickMining(8001)"
:loading="miningLoading[8001]"
>
Mining(8001)
</v-btn>
<v-btn
color="warning"
class="ml-4"
@click="onClickMining(8002)"
:loading="miningLoading[8002]"
>
Mining(8002)
</v-btn>
<v-btn
color="warning"
class="ml-4"
@click="onClickMining(8003)"
:loading="miningLoading[8003]"
>
Mining(8003)
</v-btn>
</v-col>
<v-col cols="12">
<h2>{{ blockChainHost }}:8001</h2>
</v-col>
<v-col cols="6">
<v-textarea
label="Chain"
rows="6"
v-model="bitcoinNetwork[8001].chain"
></v-textarea>
</v-col>
<v-col cols="6">
<v-textarea
label="Transactions"
rows="6"
v-model="bitcoinNetwork[8001].transactions"
></v-textarea>
</v-col>
<v-col cols="12">
<h2>{{ blockChainHost }}:8002</h2>
</v-col>
<v-col cols="6">
<v-textarea
label="Chain"
rows="6"
v-model="bitcoinNetwork[8002].chain"
></v-textarea>
</v-col>
<v-col cols="6">
<v-textarea
label="Transactions"
rows="6"
v-model="bitcoinNetwork[8002].transactions"
></v-textarea>
</v-col>
<v-col cols="12">
<h2>{{ blockChainHost }}:8003</h2>
</v-col>
<v-col cols="6">
<v-textarea
label="Chain"
rows="6"
v-model="bitcoinNetwork[8003].chain"
></v-textarea>
</v-col>
<v-col cols="6">
<v-textarea
label="Transactions"
rows="6"
v-model="bitcoinNetwork[8003].transactions"
></v-textarea>
</v-col>
</v-row>
</v-col>
</v-row>
<v-snackbar v-model="snackbar">
Sent Transaction !
<template v-slot:action="{ attrs }">
<v-btn color="success" text v-bind="attrs" @click="snackbar = false">
Close
</v-btn>
</template>
</v-snackbar>
</v-container>
</template>// pages/index.vue
.container {
min-height: 100vh;
width: 100vw;
display: flex;
align-items: center;
justify-content: center;
}ところどころ、リファクタリングの余地があるのはご容赦ください。
実装したら、各ノードを起動してから、 yarn dev コマンドで Nuxt3 を起動し動作確認してみてください。ブラウザで複数タブを表示することで、擬似的に複数のウォレットを作成することが可能となります。
まとめ
ブロックチェーンをこれから始めるヒトは、ぜひぜひ本記事でまず基本を抑えてみてください!
ブロックチェーン技術は一見とっつきにくい印象を持たれるかもしれませんが、やってみると実際そうでもありません。
開発現場では、実は一度でもブロックチェーンの実装もしくは設計を経験すれば、パターンや考え方はどのブロックチェーンネットワークでも同じですので応用が効きます。簡単に言うなら、BitCoin での開発を経験すればイーサリアムでの開発にスムーズに移行できる、ということです。
Web3、ブロックチェーン、AWSサーバーレス開発は、わたしたちへお気軽にお問い合わせください。
スモールスタート開発支援、サーバーレス・NoSQLのことなら
ラーゲイトまでご相談ください
低コスト、サーバーレスの
モダナイズ開発をご検討なら
 開発 をご希望の企業様
 下請け対応可能
Sler企業様からの依頼も歓迎
協業 をご希望の企業様 


ラーゲイトは、世界の最新技術を追い続ける
プロフェッショナルチームです。


