


AWSサーバーレスで認証認可を最短・最速で実装!サーバーレスエキスパートが、CognitoによるAWSの認可実装を解説します😎
 2021.02.25


こんにちは!
AWS でアプリケーションを構築するとき、クラウドサービスにおける認証認可を理解するのは必須と言えるでしょう。クラウドサービスは便利な反面セキュリティホールを作りやすいので、開発の際は必ず認証認可のワークフロー・注意点などを理解しておく必要があります。
本記事では、AWS によるアプリケーションの認証認可をソースコード交え解説します。
想定する読者
- AWS CognitoUserPool は理解できたけど、CognitoIdentityPool が理解できず苦戦しているヒト
- AWS IAM と CognitoIdentityPool の設定方法がわからないヒト
- AWS サーバーレスでアプリケーション開発を行うヒト
認証と認可の違い
とても重要なので、初めに解説をしたいと思います。本記事でも紹介しますが「CognitoUserPool」と「CognitoIdentityPool」は、それぞれAWSにおける役割が全く別物です。
| AWS CognitoUserPool | AWSにおける認証を扱うサービス |
| AWS CognitoIdentityPool | AWSにおける認可を扱うサービス |
認証は誰であるかを示し、認可はその誰にどんな権限を持たせるかです。現実世界においてもこの概念は、多くのシーンで使われます。
簡単な例で例えるなら「学校」です。学校では、生徒は入学すると生徒手帳をもらうことが可能であり、これを認証とします。
認証された生徒は、学校へ通学することが可能ですが、実際に校内で入室可能な部屋は教室となり、これはその生徒に与えられた認可です。
| 生徒手帳 | 学校の生徒であることを認証可能 |
| 教室への入室許可 | 生徒手帳の情報から、入室可能な部屋を学校が認可 |
生徒手帳はその学校の生徒であることを証明し、生徒手帳の情報(学年や専攻科目)で入室可能な部屋を指定しています。この概念は学校に限らず、社会の様々なシーンで使われていますね。
認証認可の概念を理解できたら、次はいよいよ Cognito による認証認可の実装方法を解説します。
Cognitoによる認証認可構築方法を解説
Congitoでは、認証を CognitoUserPool、認可を CognitoIdentityPool で行います。それぞれ、認証・認可が成功すると、文字列のトークンをレスポンスしてくれます。このトークンを各種 AWS サービスを呼び出す際のリクエストに付与することで、認証・認証な AWS サービス利用が実現します。
では、実際に手を動かして構築してみましょう。
CloudFormation ( Serverless )
認証・認可の動作検証のために、最低限な必要なインフラを構築します。
# serverless.yml
service:
  name: CognitoUserPoolAndCognitoIdPool

provider:
  name: aws
  stage: ${opt:stage,"dev"}
  region: ap-northeast-1

resources:
    - ${file(resources/cognito.yml)}
    - ${file(resources/iam-role.yml)}
    - ${file(resources/iam-role.yml)}
IAM ロール
# resources/iam-role.yml
Resources:
  # ユーザー認証成功時に適用されるロール
  AuthenticatedRole:
    Type: AWS::IAM::Role
    Properties:
      RoleName: '${self:provider.stage}-${self:service.name}-authenticated-role'
      AssumeRolePolicyDocument:
        Version: '2012-10-17'
        Statement:
        - Effect: Allow
          Principal:
            Federated: cognito-identity.amazonaws.com
          Action: sts:AssumeRoleWithWebIdentity
          Condition:
            StringEquals:
              cognito-identity.amazonaws.com:aud: !Ref IdentityPool
            ForAnyValue:StringLike:
              cognito-identity.amazonaws.com:amr: authenticated
      Path: "/"
      Policies:
        - PolicyName: AuthenticatedRolePolicy
          PolicyDocument:
            Version: '2012-10-17'
            Statement:
            - Effect: Allow
              Action: iam:ListGroups
              Resource: "*"

  # ユーザー認証失敗時に適用されるロール
  UnAuthenticatedRole:
    Type: AWS::IAM::Role
    Properties:
      RoleName: '${self:provider.stage}-${self:service.name}-unauthenticated-role'
      AssumeRolePolicyDocument:
        Version: '2012-10-17'
        Statement:
        - Effect: Allow
          Principal:
            Federated: cognito-identity.amazonaws.com
          Action: sts:AssumeRoleWithWebIdentity
          Condition:
            StringEquals:
              cognito-identity.amazonaws.com:aud: !Ref IdentityPool
            ForAnyValue:StringLike:
              cognito-identity.amazonaws.com:amr: unauthenticated
      Path: "/"
      Policies:
        - PolicyName: UnAuthenticatedRolePolicy
          PolicyDocument:
            Version: '2012-10-17'
            Statement:
            - Effect: Allow
              Action: dynamodb:ListTables
              Resource: "*"

  # Adminグループのユーザー認証成功時に適用されるロール
  AdminAuthenticatedRole:
    Type: AWS::IAM::Role
    Properties:
      RoleName: '${self:provider.stage}-${self:service.name}-admin-authenticated-role'
      AssumeRolePolicyDocument:
        Version: '2012-10-17'
        Statement:
        - Effect: Allow
          Principal:
            Federated: cognito-identity.amazonaws.com
          Action: sts:AssumeRoleWithWebIdentity
          Condition:
            StringEquals:
              cognito-identity.amazonaws.com:aud: !Ref IdentityPool
            ForAnyValue:StringLike:
              cognito-identity.amazonaws.com:amr: authenticated
      Path: "/"
      Policies:
        - PolicyName: AdminAuthenticatedRolePolicy
          PolicyDocument:
            Version: '2012-10-17'
            Statement:
            - Effect: Allow
              Action: lambda:ListFunctions
              Resource: "*"

  # Userグループのユーザー認証成功時に適用されるロール
  UserAuthenticatedRole:
    Type: AWS::IAM::Role
    Properties:
      RoleName: '${self:provider.stage}-${self:service.name}-user-authenticated-role'
      AssumeRolePolicyDocument:
        Version: '2012-10-17'
        Statement:
        - Effect: Allow
          Principal:
            Federated: cognito-identity.amazonaws.com
          Action: sts:AssumeRoleWithWebIdentity
          Condition:
            StringEquals:
              cognito-identity.amazonaws.com:aud: !Ref IdentityPool
            ForAnyValue:StringLike:
              cognito-identity.amazonaws.com:amr: authenticated
      Path: "/"
      Policies:
        - PolicyName: UserAuthenticatedRolePolicy
          PolicyDocument:
            Version: '2012-10-17'
            Statement:
            - Effect: Allow
              Action: dynamodb:ListTables
              Resource: "*"
CognitoUserPool & CognitoIdentityPool
# resources/cognito.yml
Resources:
  UserPool:
    Type: AWS::Cognito::UserPool
    Properties:
      UserPoolName: '${self:provider.stage}-${self:service.name}-userpool'
      UsernameConfiguration:
        CaseSensitive: true

  UserPoolClient:
    Type: AWS::Cognito::UserPoolClient
    Properties:
      ClientName: '${self:provider.stage}-${self:service.name}-userpool-client'
      # ユーザープールクライアントでサポートされている認証フロー
      ExplicitAuthFlows: [ ALLOW_ADMIN_USER_PASSWORD_AUTH, ALLOW_REFRESH_TOKEN_AUTH, ALLOW_USER_PASSWORD_AUTH, ALLOW_USER_SRP_AUTH ]
      # 各トークンの時間制限
      AccessTokenValidity: 600
      IdTokenValidity: 600
      RefreshTokenValidity: 1
      # 各トークンの有効時間を表す単位
      TokenValidityUnits:
        AccessToken: seconds
        IdToken: seconds
        RefreshToken: days
      # ユーザープールクライアントを作成するユーザープールのユーザープール ID
      UserPoolId: !Ref UserPool

  IdentityPool:
    Type: AWS::Cognito::IdentityPool
    Properties:
      IdentityPoolName: '${self:provider.stage}-${self:service.name}-identitypool'
      # ID プールが認証されていないログインをサポートするかどうか
      AllowUnauthenticatedIdentities: true
      # Amazon Cognito ユーザープールとそのクライアント ID
      CognitoIdentityProviders:
        - ClientId: !Ref UserPoolClient
          ProviderName: !GetAtt UserPool.ProviderName

  IdentityPoolRoleAttachment:
    Type: AWS::Cognito::IdentityPoolRoleAttachment
    Properties:
      IdentityPoolId: !Ref IdentityPool
      # 認証成功時および失敗時に与えるロールの指定
      Roles:
        "authenticated": !GetAtt AuthenticatedRole.Arn
        "unauthenticated": !GetAtt UnAuthenticatedRole.Arn
      # グループのロールを適用するためには RoleMappings の設定が必要
      # 設定がない場合は、グループにロールが設定されていてもユーザーに適用されない
      RoleMappings:
        roleMapping:
          AmbiguousRoleResolution: AuthenticatedRole
          IdentityProvider: !Sub cognito-idp.${self:provider.region}.amazonaws.com/${UserPool}:${UserPoolClient}
          # ユーザーをロールにマッピングするために使用されるルール
          RulesConfiguration:
            Rules:
              - Claim: isAdmin
                MatchType: Equals
                RoleARN: !GetAtt AdminAuthenticatedRole.Arn
                Value: yes
              - Claim: isUser
                MatchType: Equals
                RoleARN: !GetAtt UserAuthenticatedRole.Arn
                Value: yes
          Type: Token

  UserPoolAdminGroup:
    Type: 'AWS::Cognito::UserPoolGroup'
    Properties:
      Description: '${self:provider.stage}-${self:service.name}'
      GroupName: 'Admin'
      # 優先順位を指定
      Precedence: 0
      UserPoolId: !Ref UserPool
      # グループに付与したいロールを指定
      RoleArn: !GetAtt AdminAuthenticatedRole.Arn

  UserPoolUserGroup:
    Type: 'AWS::Cognito::UserPoolGroup'
    Properties:
      Description: '${self:provider.stage}-${self:service.name}'
      GroupName: 'User'
      Precedence: 1
      UserPoolId: !Ref UserPool
      RoleArn: !GetAtt UserAuthenticatedRole.Arn
これで、必要最低限なインフラの構築は完了です。上記では、認証・認可に使用する Cognito、どのような権限を付与するのかを決定する IAM を構築しています。
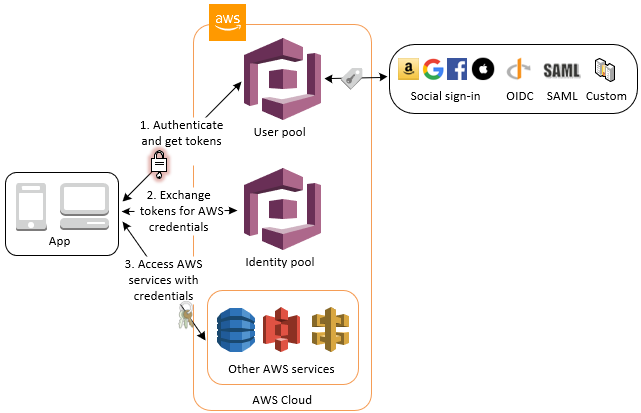
AWS によるアプリケーションの認証・認可は、まず CognitoUserPool から認証トークンを受け取り、その認証トークンに対応した認可トークンをCognitoIdentityPool から取得するワークフローとなります。
上記を応用することで、SPA のウェブアプリケーションのフロントエンドから直接、安全に S3 へバイナリーファイルをアップロードすることが可能となります。ぜひ応用してみてください。
次は、読者の方が実戦ですぐに取り組めるように、ウェブのフロントエンドで認証認可を行うサンプルコードを紹介します。
NuxtJS で Cognito から認証認可を取得
構築した Cognito, IAM を使用し認証認可を取得、AWS リソースへアクセスします。まずは、NuxtJS の雛形を入手しましょう。
公式サイトに則り NuxtJS の雛形をインストール
yarn create nuxt-app myApp
cd myApp
認証・認可の共通処理実装 ( AWS SDK )
作成した NuxtJS へ、認証認可の共通処理を作成します。私たちが普段実際に使用している雛形を紹介しますので、コピペでどうぞご利用ください。(事前に環境変数を nuxt.config.js で定義しておいてください)
// services/awsService.js
const AWS = require('aws-sdk');

// 環境変数は、nuxt.config.jsで定義してください
const REGION = process.env.AWS_REGION;
const USER_POOL_ID = process.env.AWS_COGNITO_USER_POOL_ID;
const IDENTITY_POOL_ID = process.env.AWS_COGNITO_IDENTITY_POOL_ID;
const IDP = `cognito-idp.${REGION}.amazonaws.com/${USER_POOL_ID}`;

/**
 * IdentityPoolトークンが付与されているAWSインスタンスを取得
 * @param {String} jwtToken
 */
const refreshCredentials = (jwtToken = undefined) => new Promise((resolve, reject) => {
  AWS.config.region = REGION;

  // CognitoIDプールへの連携情報を生成
  const params = {
    IdentityPoolId: IDENTITY_POOL_ID,
  };
  if (jwtToken) params.Logins = {
    [IDP]: jwtToken
  }
  AWS.config.credentials = new AWS.CognitoIdentityCredentials(params);

  // 資格情報を取得
  AWS.config.credentials.get(function () {
    resolve({
      accessKeyId: AWS.config.credentials.accessKeyId,
      secretAccessKey: AWS.config.credentials.secretAccessKey,
      sessionToken: AWS.config.credentials.sessionToken
    });
  });
});

module.exports = {
  refreshCredentials,
  AWS
};
// services/cognitoService.js
const AmazonCognitoIdentity = require('amazon-cognito-identity-js');
const {refreshCredentials} = require('./awsService')
// 本処理の設定内容
const CLIENT_ID = process.env.AWS_COGNITO_CLIENT_ID
const USER_POOL_ID = process.env.AWS_COGNITO_USER_POOL_ID
// ユーザープール作成
const poolData = {
UserPoolId: USER_POOL_ID,
ClientId: CLIENT_ID
};
const userPool = new AmazonCognitoIdentity.CognitoUserPool(poolData);
/**
* ユーザーをCognitoで認証
* @description 認証後、Idプールとの連携も実施
* @param {String} username
* @param {String} password
*/
const authenticateUser = (username, password) => {
// ユーザーデータ作成
const userData = {
Username: username,
Pool: userPool,
};
const cognitoUser = new AmazonCognitoIdentity.CognitoUser(userData);
// 認証情報を作成
const authenticationData = {
Username: username,
Password: password,
};
const authenticationDetails = new AmazonCognitoIdentity.AuthenticationDetails(
authenticationData
);
return new Promise((resolve, reject) => {
cognitoUser.authenticateUser(authenticationDetails, {
onSuccess: function (result) {
refreshCredentials(result.getIdToken().getJwtToken())
.catch(console.error)
.then(console.log)
.finally(() => resolve(result))
},
onFailure: function (err) {
console.log('ログイン失敗', err)
reject(err)
}
});
})
};
module.exports = {
authenticateUser
};getとrefreshの使い分け
AWSの公式ドキュメントを見ると、認可トークンの取得・更新方法で下記の二つの関数が提供されていることがわかります。
- get
- refresh
結論から申し上げまると、基本的にはget関数を利用しましょう。認証情報が期限切れの場合にも更新をおこないます。refresh関数は主にSDKが、認証情報が期限切れになった場合に裏側で自動的に呼び出す際に利用する関数です。
また、refresh関数を使用すると使用中の認証情報の再ロードが実施されないため、getを使用するべきです。(有効な再度認証情報があるのに再度認証情報を取得してしまいます)
AWS リソースへアクセスするサンプルコード
本記事では、認可トークンを使用した AWS リソースへのアクセス成功までを紹介したいので、簡易的で実用的ではないですが各リソースへのアクセス検証用のソースコードも紹介します。
// services/dynamoDBService.js
const {AWS} = require('./awsService');

/**
 * DynamoDB一覧取得
 */
const listTables = async () => new Promise((resolve, reject) => {
  const dynamodb = new AWS.DynamoDB();
  dynamodb.listTables({}, (err, data) => {
    if (err) {
      console.error('Error', err);
      reject(err)
    } else {
      console.log('Success', JSON.stringify(data, null, 2));
      resolve(data)
    }
  });
});

module.exports = {
  listTables
};
// services/iamService.js
const {AWS} = require('./awsService');
/**
* IAMのリストグループ取得
*/
const listIamListGroups = async () => new Promise((resolve, reject) => {
const iam = new AWS.IAM();
iam.listGroups({}, (err, data) => {
if (err) {
console.error('Error', err);
reject(err)
} else {
console.log('Success', JSON.stringify(data, null, 2));
resolve(data)
}
});
});
module.exports = {
listIamListGroups
};// services/lambdaService.js
const {AWS} = require('./awsService');
/**
* Lambdaファンクション一覧取得
*/
const listFunctions = async () => new Promise((resolve, reject) => {
const lambda = new AWS.Lambda();
lambda.listFunctions({}, (err, data) => {
if (err) {
console.error('Error', err);
reject(err)
} else {
console.log('Success', JSON.stringify(data, null, 2));
resolve(data)
}
});
});
module.exports = {
listFunctions
};ポイントなのは、認可トークンを受けた AWS インスタンスを使用している点です。認可が必要な AWS リソースへのアクセスは、プロセス中のAWSインスタンスに認可トークンを設定し SDK を実行することで実現できます。
また余談ですが、AWS には APIGateway、AppSync など認証トークンのみでアクセス可能な AWS リソースも存在します。必要に応じて、認証トークンと認可トークンを使い分けましょう。
AWS へのアクセス実行
では用意したソースコードを使用して、AWS リソースへアクセスしましょう。本サンプルでは、NuxtJS のデフォルトで用意されている pages/index.vue に処理を記述します。実際のプロジェクトではより適切な場所へ AWS リソースアクセスを記述してください。
pages/index.vue
<template>
  <div class="container">
    <section class="input-container">
      <input name="username" placeholder="username" v-model="username"/>
      <input name="password" placeholder="password" v-model="password"/>
      <button @click="onClickAuthSubmit">認証</button>
    </section>
    <section class="action-list">
      <button @click="onClickListFunctions">lambda:listFunctions</button>
      <button @click="onClickListDynamoDBTables">dynamodb:ListTables</button>
      <button @click="onClickIamListGroup">iam:ListGroups</button>
      <button @click="onClickUnAuthenticatedRole">UnAuthenticatedRole</button>
    </section>
    <div class="console">{{text}}</div>
  </div>
</template>
<script>
import {authenticateUser} from '../services/cognitoService';
import {listFunctions} from '../services/lambdaService';
import {listTables} from '../services/dynamoDBService';
import {listIamListGroups} from '../services/iamService';
import {refreshCredentials} from '../services/awsService';
export default {
name: 'index',
data() {
return {
text: '',
username: '',
password: '',
auth: {}
}
},
mounted() {
if (
process.env.AWS_COGNITO_IDENTITY_POOL_ID.length === 0
|| process.env.AWS_COGNITO_CLIENT_ID.length === 0
|| process.env.AWS_COGNITO_USER_POOL_ID.length === 0
|| process.env.AWS_REGION.length === 0
) alert('nuxt.config.jsのenvへ有効なAWS環境情報を入力してください。');
},
methods: {
async onClickAuthSubmit() {
if (this.username.length === 0 || this.password.length === 0) return;
try {
this.auth = await authenticateUser(this.username, this.password);
this.text = JSON.stringify(this.auth, null, 2);
} catch (e) {
this.text = JSON.stringify(e, null, 2);
console.error('認証処理失敗', e)
}
},
async onClickListFunctions() {
try {
const res = await listFunctions();
this.text = JSON.stringify(res, null, 2);
} catch (e) {
this.text = JSON.stringify(e, null, 2);
console.error('lambda:listFunctions失敗', e);
}
},
async onClickListDynamoDBTables() {
try {
const res = await listTables();
this.text = JSON.stringify(res, null, 2);
} catch (e) {
this.text = JSON.stringify(e, null, 2);
console.error('lambda:listFunctions失敗', e);
}
},
async onClickIamListGroup() {
try {
const res = await listIamListGroups();
this.text = JSON.stringify(res, null, 2);
} catch (e) {
this.text = JSON.stringify(e, null, 2);
console.error('lambda:listFunctions失敗', e);
}
},
async onClickUnAuthenticatedRole() {
try {
const res = await refreshCredentials();
this.text = JSON.stringify(res, null, 2);
} catch (e) {
this.text = JSON.stringify(e, null, 2);
console.error('lambda:listFunctions失敗', e);
}
}
},
}
</script>CSS はおまけです。多少は見栄えいい方が動作検証しやすいかなと。
<style>
.container {
width: 100%;
margin: 0 auto;
min-height: 100vh;
display: flex;
justify-content: center;
align-items: center;
text-align: center;
flex-direction: column;
}
.input-container {
display: flex;
width: 700px;
justify-content: space-between;
margin-bottom: 16px;
}
.input-container input {
width: 100%;
margin-right: 24px;
}
.input-container input:last-child {
margin-right: 0;
}
.input-container button {
width: 200px;
}
.action-list {
width: 700px;
margin: 0 0 16px 0;
}
.action-list button {
width: 150px;
padding: 5px 10px;
margin-bottom: 5px;
}
.console {
background-color: #333;
color: #fff;
width: 700px;
height: 400px;
overflow: scroll;
padding: 16px;
word-break: break-all;
}
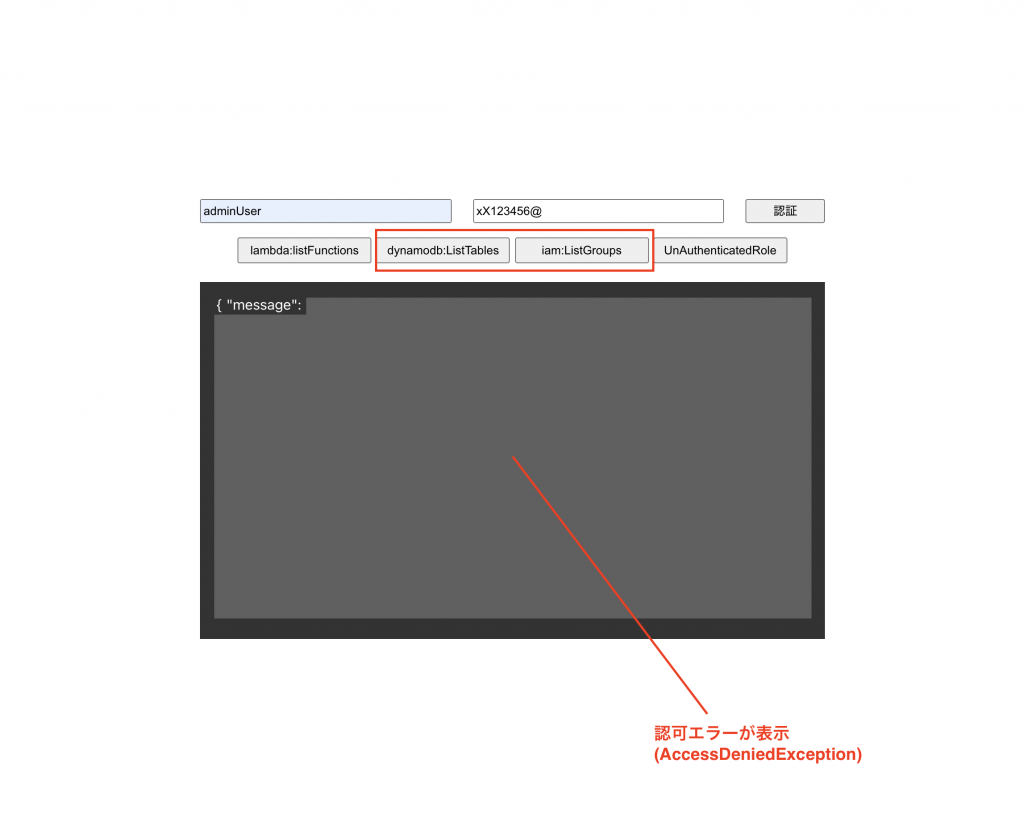
</style>実際に AWS リソースアクセスが成功した様子
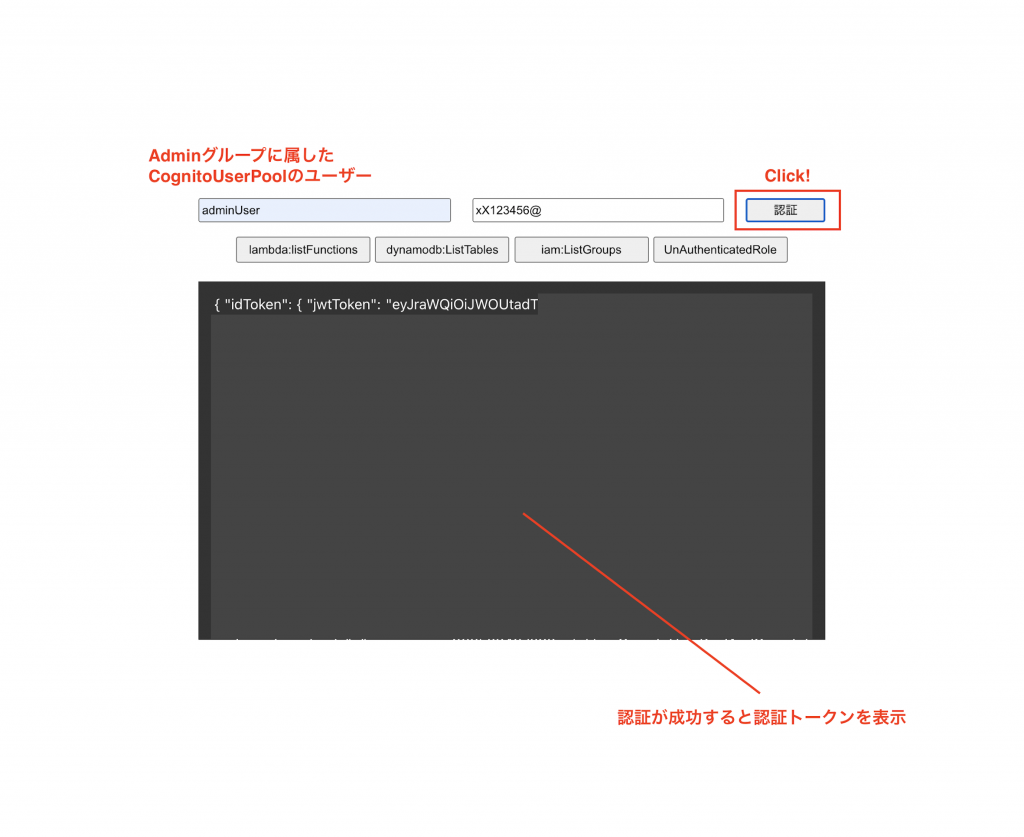
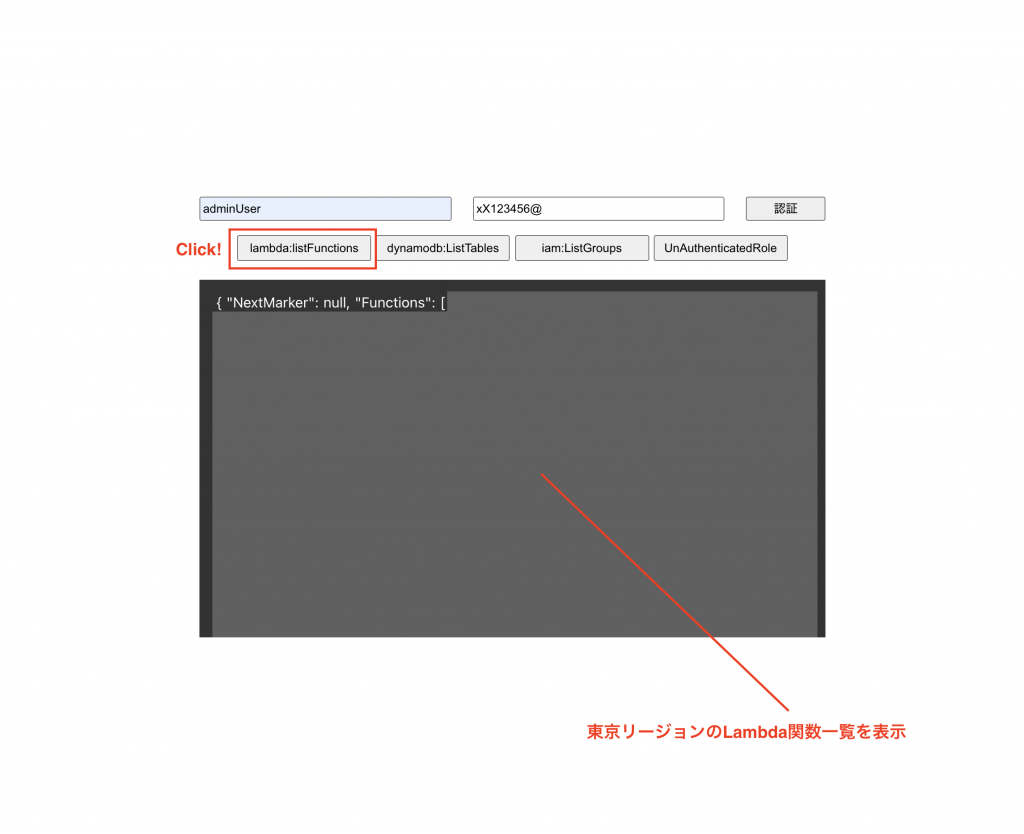
事前に検証用のユーザーを CognitoUserPool へ作成しておいてください。尚、ユーザーが属するユーザーグループによって、付与される IAM ロールが異なるので注意しましょう。

まとめ
本記事の内容を習得することで、AWS の実装可能な範囲が大きく広がると思います。
私たちが思う認証認可の一番の要点は、フロントエンドのエンジニアも認証認可に対して知見を持つことが重要だということです。フロントエンドエンジニアとサーバーサイドエンジニアが分業している企業がほとんどだとは思いますが、クラウドを用いた今時のクラウドネイティブな開発では、本記事でも紹介した認証認可を始めとして、フロントエンドエンジニアもインフラを意識することが求められています。
私たちのチームは、全員が AWS によるインフラ構築・フロントエンドの実装に精通し、シームレスなプロジェクト運営をお客様へ提供しています。
サーバーレス開発は、お気軽にお問い合わせください。
スモールスタート開発支援、サーバーレス・NoSQLのことなら
ラーゲイトまでご相談ください
低コスト、サーバーレスの
モダナイズ開発をご検討なら
 開発 をご希望の企業様
 下請け対応可能
Sler企業様からの依頼も歓迎
協業 をご希望の企業様 


ラーゲイトは、世界の最新技術を追い続ける
プロフェッショナルチームです。


