


Amplifyで自動構築される内容の観察:DynamoDB編
 2021.05.10


こんにちは!
この記事は Amplify CLI を使って自動構築されたリソースを観察するシリーズです。VTL 編と、Schema.graphql 編もありますので、こちらも併せてご覧ください!
想定する読者
- Amplify が気になっているヒト
- Amplify CLI を使ってみたいヒト
- 最近 Amplify CLI を知ったヒト
はじめに
GraphQL を作成するコマンドは対話型のため、以下のように設定しました。
なお「Amplfiy で自動構築される内容の観察」シリーズすべての記事は、下記の設定を利用しております。
$ amplify add api
? Please select from one of the below mentioned services: GraphQL
? Provide API name: amplifytest
? Choose the default authorization type for the API Amazon Cognito User Pool
 Do you want to use the default authentication and security configuration? Default configuration
 How do you want users to be able to sign in? Username
 Do you want to configure advanced settings? No, I am done.
? Do you want to configure advanced settings for the GraphQL API No, I am done.
? Do you have an annotated GraphQL schema? No
? Choose a schema template: Single object with fields (e.g., “Todo” with ID, name, description)
? Do you want to edit the schema now? No
$ amplify push
? Are you sure you want to continue? Yes
? Do you want to generate code for your newly created GraphQL API Yes
? Choose the code generation language target javascript
? Enter the file name pattern of graphql queries, mutations and subscriptions src/graphql/**/*.js
? Do you want to generate/update all possible GraphQL operations - queries, mutations and subscriptions Yes
? Enter maximum statement depth [increase from default if your schema is deeply nested] 2※Amplify CLI のバージョンは 4.44.1になります。
作成される DynamoDB を解説
それでは作成される DynamoDB テーブルを見ていきましょう。まずは基本的なスキーマにおける DynamoDB テーブルの動きです。
type Todo @model {
  id: ID!
  name: String!
  description: String
}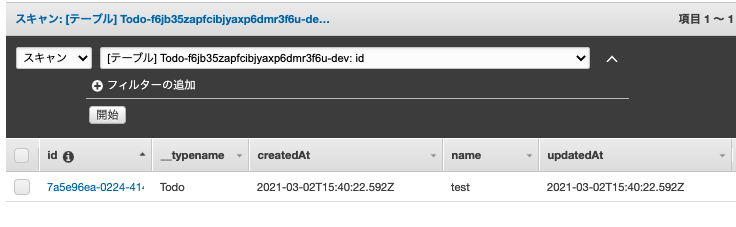
実際にレコードを作成すると、上記のようにレコードが表示されます。パーティションキーが id となっている基本的なテーブル構造です。
では様々なスキーマを定義して DynamoDB のテーブル構造がどう変化していくのかを観察してみましょう。
グローバルセカンダリインデックスの作成
以下のスキーマで amplify push します。
type Todo @model
  @key(name: "todosByStatus", fields: ["status"], queryField: "todosByStatus") {
  id: ID!
  name: String!
  status: String!
}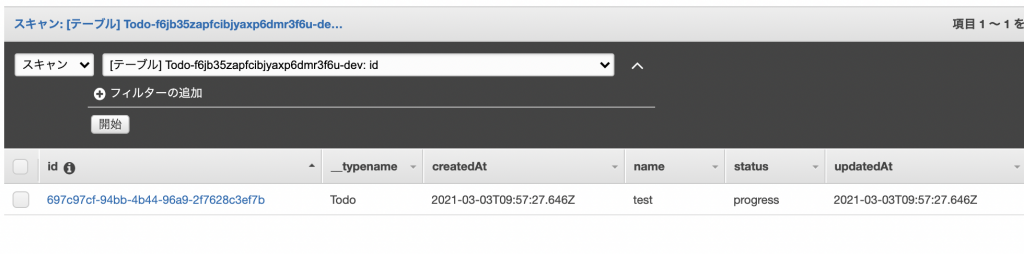
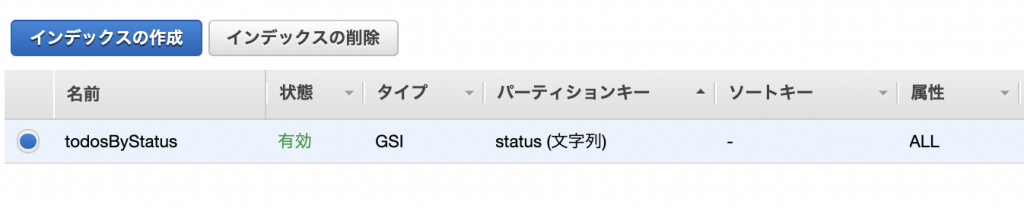
@key ディレクティブを使うことで、DynamoDB にインデックスを作成しています。上記の場合は、「status」に対してインデックスを作成しております。
つまり Amplify は、定義するスキーマ内に @key ディレクティブを加え、条件を記述することで自動的に作成されるということです。
CloudFormation で記述すると、以下のような部分を設定しているということになります。
Resources:
  DynamoDBTable:
    Type: AWS::DynamoDB::Table
    Properties:
      TableName: Todo-xxxxxxxx
      AttributeDefinitions:
        - AttributeName: id
          AttributeType: S
        - AttributeName: status
          AttributeType: S
      KeySchema:
        - AttributeName: id
          KeyType: HASH
      GlobalSecondaryIndexes:
        - IndexName: todoByStatus
          KeySchema:
            - AttributeName: status
              KeyType: HASH
          Projection:
            ProjectionType: ALL
では次に @key ディレクティブに手を加えてソートキーを設定してみましょう!
パーティションキー+ソートキー
以下のスキーマを amplify push してみましょう。
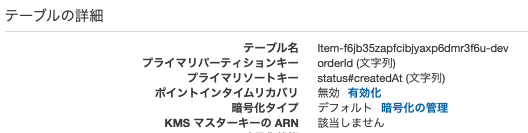
type Item @model
  @key(fields: ["orderId", "status", "createdAt"])
  @key(name: "ByStatus", fields: ["status", "createdAt"], queryField: "itemsByStatus") {
  orderId: ID!
  status: Status!
  createdAt: AWSDateTime!
  name: String!
}
enum Status {
  DELIVERED
  IN_TRANSIT
  PENDING
  UNKNOWN
}
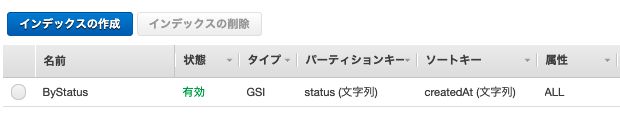
最初の @key は常にパーティションキーとして設定されます。2つ目の @key が指定されている場合、このフィールドがソートキーになります。これによりパーティション+ソートキーのテーブルを作成することができます。
なおキーとしたい場所は、@key ディレクティブの fields パラメータに指定することで設定が可能です。
このケースは CloudFormation で記述すると、以下のような部分を設定しているということになります。
Resources:
  DynamoDBTable:
    Type: AWS::DynamoDB::Table
    Properties:
      TableName: Item-xxxxxxxx
      AttributeDefinitions:
        - AttributeName: orderId
          AttributeType: S
        - AttributeName: status#createdAt
          AttributeType: S
        - AttributeName: status
          AttributeType: S
        - AttributeName: createdAt
          AttributeType: S
      KeySchema:
        - AttributeName: orderId
          KeyType: HASH
        - AttributeName: status#createdAt
          KeyType: RANGE
      GlobalSecondaryIndexes:
        - IndexName: todoByStatus
          KeySchema:
            - AttributeName: status
              KeyType: HASH
            - AttributeName: createdAt
              KeyType: RANGE
          Projection:
            ProjectionType: ALL
以上の要領で DynamoDB テーブルを Amplify で構築していきましょう!
関連記事
まとめ
Amplify の特徴としてスキーマの定義にディレクティブを多用するため、スキーマはひとつの設計図となっています。
ですので DynamoDB の設計と合わせて @key ディレクティブを含めたスキーマの定義も考えていかなければなりませんね。深く理解して活用していきましょう!
このブログでは、GraphQL や GraphQL のマネージドサービスである AWS AppSync の記事をどんどん公開しておりますので、ご興味のある方はほかの記事もご覧いただければと思います。
AppSync に関する開発は、お気軽にお問い合わせください。
スモールスタート開発支援、サーバーレス・NoSQLのことなら
ラーゲイトまでご相談ください
低コスト、サーバーレスの
モダナイズ開発をご検討なら
 開発 をご希望の企業様
 下請け対応可能
Sler企業様からの依頼も歓迎
協業 をご希望の企業様 


ラーゲイトは、世界の最新技術を追い続ける
プロフェッショナルチームです。


