


スタートアップCTOがVue3とVue2の違い・Vue3の注目機能を分かりやすくまとめ🙌!Vue3の導入を悩んでいるなら必見です👀
 2021.07.09


こんにちは!
わたしたちは数多くのプロジェクトに Vue3 を導入してきましたが、保守性・パフォーマンスともに本当に魅力的なフレームワークだなといつも感じています。特にNuxt3が登場してから、ますます幅広い利用が可能なフレームワークとなりました。
本記事では、今流行りの Vue3 の注目機能& Vue2.x との違いについて、実際の経験談を交え詳しく解説いたします。導入を悩んでいる方は、ぜひ本記事を参考にしてください。
想定する読者
はじめに
NuxtJS の Vue3 対応について
Nuxt2でVue3対応する場合は、別途モジュールをインストールしましょう。
残念ながら、Issue でも議論されている通り、2021年7月現在非対応の様子です。ただし、CompositionAPI(後述)は、別途モジュールを設定することで実現可能です。
世界中のユーザーから要望が上がってますので、近い将来対応される可能性が非常に高いです、NuxtJS ユーザーの方は、まずは手軽に(というよりも移行しやすいように)Composition API の導入から行ってみてはいかがでしょうか。
Vue2.x との違い
本記事では、私たち実装者の目線で重大な変更にのみ絞り解説したいと思います。
※より詳細な変更点については公式サイトを確認してください。
Vue のグローバル API の更新
Vue インスタンス自体に大きな更新が入りました。以下の表に Vue インスタンスの更新内容をまとめています。
| Vue 2.x | Vue 3.x |
| Vue.config | app.config |
| Vue.config.productionTip | 削除(参照) |
| Vue.config.ignoredElements | app.config.compilerOptions.isCustomElement(参照) |
| Vue.component | app.component |
| Vue.directive | app.directive |
| Vue.mixin | app.mixin |
| Vue.use | app.use(参照) |
| Vue.prototype | app.config.globalProperties(参照) |
| Vue.extend | 削除(参照) |
Vue.extend の削除
Vue2 ユーザーにとって馴染み深いシンタックスが削除となります。CompositionAPI の標準化(CompositionAPI については後述)により、defineComponentを使用する形となります。
コンポーネント継承や Mixin は非推奨
Vue 3 では、継承やミックスインよりも、CompositionAPI を介したコンポジションを使用することが強く推奨されます。何らかの理由でコンポーネントの継承が必要な場合は、代わりに extends オプションを使用できます。
継承や Mixin を多用しているユーザーは注意が必要です。
テンプレートディレクティブ
以下の通り、更新が入りました。
- v-model を子 Component に渡すことで双方向性バインディングが可能に
- key ノード<template v-for>と非 v-for ノードの使用法が変更に
- v-if そして、v-for 同じ要素で使用の優先順位が変更に
- v-bind=”object” の適用方法が変更に
- v-on:event.native 修飾子が削除に
- ref 内部 v-for は参照の配列を登録しなくなりました
v-model を子 Component 渡すことで双方向性バインディングが可能に
v-model を渡すだけで、親の Component と双方向性するための Props 及び Emit が暗黙的にバインドされます。コード量が減りエレガントですね。
<ChildComponent v-model:title="pageTitle" />

<!-- 上記は以下の略-->

<ChildComponent :title="pageTitle" @update:title="pageTitle = $event" />
key ノード<template v-for>と非 v-for ノードの使用法が変更に
Vue2 では、v-if/ v-else/v-else-ifを使用する際、key 属性指定が推奨されてましたが、Vue3 からは不要となりました。
<!-- Vue 2.x -->
<div v-if="condition" key="yes">Yes</div>
<div v-else key="no">No</div>

<!-- Vue 3.x -->
<div v-if="condition">Yes</div>
<div v-else>No</div>加えて、<template v-for>構文を使用する際、親に key を指定することで、子供に対する key 属性も不要となりました。よりシンプルなシンタックスとなりました。
<!-- Vue 2.x -->
<template v-for="item in list">
  <div :key="'heading-' + item.id">...</div>
  <span :key="'content-' + item.id">...</span>
</template>

<!-- Vue 3.x -->
<template v-for="item in list" :key="item.id">
  <div>...</div>
  <span>...</span>
</template>
v-if そして、v-for 同じ要素で使用の優先順位が変更に
Vue2 では、v-ifとv-forが同じ要素に設定している場合、v-forが優先されてきましたが、Vue3 からはv-ifが優先されます。
v-bind=”object” の適用方法が変更に
Vue3 では、v-bindを使用し同じ属性値を設定した場合、属性の順番で優先順位が変わります。以下の例の通り、後に指定したv-bindまたはidが適用されます。
<!-- template -->
<div id="red" v-bind="{ id: 'blue' }"></div>
<!-- result -->
<div id="blue"></div>

<!-- template -->
<div v-bind="{ id: 'blue' }" id="red"></div>
<!-- result -->
<div id="red"></div>
v-on:event.native 修飾子が削除に
Vue2 ではv-onに.nativeを適用できましたが、Vue3 からは Emit を使用するように変更になりました。
<!-- Vue 2.x -->
<my-component
  v-on:close="handleComponentEvent"
  v-on:click.native="handleNativeClickEvent"
/>

<!-- Vue 3.x -->
<my-component
  v-on:close="handleComponentEvent"
  v-on:click="handleNativeClickEvent"
/>
<script>
  export default {
    emits: ['close']
  }
</script>
v-for による refs は自動登録されなくなりました
Vue2 ではv-forでループ時、$refsを自動的に作成可能でしたが Vue3 からは明示的に$refを設定する必要があります。$refはフォーム関連でもよく使用するテクニックなので確実に抑えておきましょう。(input などのフォーム要素をループ処理でレンダリングした後、$refを扱いたい時などは注意が必要です)
<div v-for="item in list" :ref="setItemRef"></div>// CompositionAPI
import { onBeforeUpdate, onUpdated } from 'vue'
export default {
setup() {
let itemRefs = []
const setItemRef = el => {
if (el) {
itemRefs.push(el)
}
}
onBeforeUpdate(() => {
itemRefs = []
})
onUpdated(() => {
console.log(itemRefs)
})
return {
setItemRef
}
}
}Vue2.x から Vue3 へのマイグレーション
Vue2 から Vu3 へのマイグレーション手順については公式サイトで公開されていますのでそちらを参照してください。
Vue3 の注目機能 🎉🎉
以下が注目機能の(順次解説)となります、Vue3 サイト公式でも紹介されていますが、少々わかりにくい表現が多いため、私たちの例を交えながら紹介したいと思います。
CompositionAPI
CompositionAPI は、Vue3 から新たに提供された API(新たな Vue ファイルの JSの記述方式)です。Vue2 系の Option API も引き続き提供される様子なので、Vue2 から移行してきたアプリケーションは、無理に CompositionAPI へ変更する必要はないです。
ただし後述に記載する通り、新規実装の場合は例外なく CompositionAPI での実装が推奨されます。(既存も余力あれば CompositionAPI への移行を推奨)
従来の OptionAPI の記述についておさらい
以下は、特定のユーザーのリポジトリのリスト表示する ComponentのOptionAPI による実装例です。
export default {
  components: { RepositoriesFilters, RepositoriesSortBy, RepositoriesList },
  props: {
    user: {
      type: String,
      required: true
    }
  },
  data () {
    return {
      repositories: [], // 1
      filters: { ... }, // 3
      searchQuery: '' // 2
    }
  },
  computed: {
    filteredRepositories () { ... }, // 3
    repositoriesMatchingSearchQuery () { ... }, // 2
  },
  watch: {
    user: 'getUserRepositories' // 1
  },
  methods: {
    getUserRepositories () {
      // using `this.user` to fetch user repositories
    }, // 1
    updateFilters () { ... }, // 3
  },
  mounted () {
    this.getUserRepositories() // 1
  }
}- ユーザーのリポジトリをリスト取得、ユーザーが変更される度に表示更新
searchQuery文字列を使用してリポジトリを検索filtersを使用したリポジトリのフィルタリング
従来の OptionAPI を使用した見慣れた実装ですが、機能が大きくなると、論理的に理解・把握の難しいコード(最初からコンポーネントを作成しなかった人にとって読みにくく、理解しにくいコード)となってしまう可能性が非常に高いです。
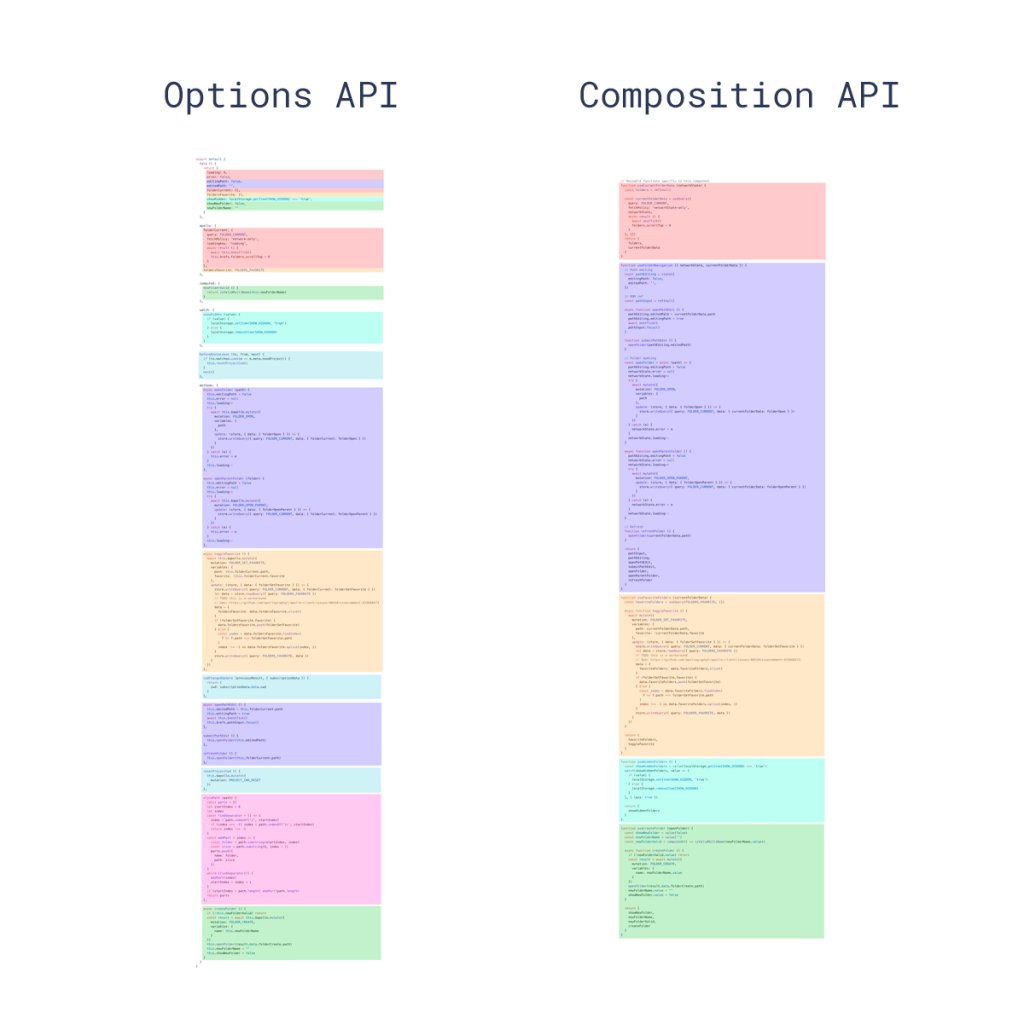
以下の色付けされた画像は、OptionAPI で記述されたソースコードの論理的整理を表していますが、OptionAPI での実装は複雑になりがちなのが伺えます…。
CompositionAPI の記述例
Vue3 では、従来の OptionAPI の課題を解決する新たな API としてCompositionAPI が提供されています。 以下は、私たちが実装した、学校の生徒の成績を表示する CompositionAPI のサンプルコードです。
import {
  ref,
  defineComponent,
  onMounted,
  onBeforeMount,
  watch,
  computed,
  toRefs,
} from "vue";
import { listStudentScoreByStudentId, StudentScore } from "../api/student";
import _ from "lodash";

type Props = {
  studentName: String;
  studentId: String;
};

export default defineComponent({
  name: "StudentScore",
  props: {
    studentName: {
      type: String,
      required: true,
    },
    studentId: {
      type: String,
      required: true,
    },
  },
  emits: ["update:studentId", "logout"],
  setup: (props: Props, { emit }) => {
    // refでリアクティブな値を生成
    const show = ref<boolean>(false);
    const selectedCategory = ref<number>(1);
    const studentScore = ref<StudentScore[]>([]);
    const modalOpen = ref<boolean>(false);

    // Propsの変更に確実に反応するためにRef化
    const { studentId } = toRefs(props);

    // methods
    const toggleShow = () => (show.value = !show.value);
    const fetchStudentScore = async () =>
      (studentScore.value = await listStudentScoreByStudentId(props.studentId));
    const updateSelectedCategory = (category: number) =>
      (selectedCategory.value = category);

    // computed
    const studentScoreSummary = computed(() =>
      _.chain(studentScore.value)
        .filter(
          (item) =>
            item.category === selectedCategory.value &&
            item.studentId === v.value
        )
        .sumBy("score")
        .value()
    );

    // watchによる追跡(Propsの変更で発火)
    watch(studentId, fetchStudentScore);

    // ライフサイクルフック登録(マウント後に生徒情報をフェッチ)
    onMounted(() => fetchStudentScore());

    // emitによる子から親へのイベント発火
    const removeStudent = () => emit("removeStudentById", studentId.value);

    return {
      show,
      toggleShow,
      studentScoreSummary,
      updateSelectedCategory,
      selectedCategory,
      modalOpen,
      removeStudent
    };
  },
});正直見慣れない記述が幾つもあると思いますが、私たちの考える OptionAPI と CompositionAPI の違いをまとめると次のようになります。
OptionAPI と CompositionAPI の実装面での主な違い
- data, computed, method等の Vue 機能は全て setup 関数に定義
- ライフサイクルのフックは setup 関数に定義
- リアクティブ(変更検知)したい値は全て Ref で指定必須
- 暗黙的に動作していた部分を全て明示的に実装する必要有
CompositionAPI のメリット
- setup 関数内部のみで完結できるのでネイティブ JS を書くような感覚
- 従来の Vue の暗黙的部分が排除され、Typescript の恩恵を享受できる
- Vue 内部の処理のオーバーヘッドが減少しレンダリングのパフォーマンスが大幅に向上
- Component 内の State のリアクティブが明示的なので状態を追いやすく、状態変化の見通しが良い
- 大規模化してもソースコードの見通しが良い
以下は、OptionAPI と CompositionAPI の論理的整理を行なったサンプルですが、ソースコードの見通しが Composition API の方が優れているのが一目瞭然です。
Teleport
任意の HTML の箇所に VueJS の Component をレンダリングする機能です。モーダルウィンドウを Body 直下に展開したい時などに使用します。
以下の例では、Body タグの直下にモーダルウィンドウのコンテンツをレンダリングしています。
<button @click="modalOpen = true">
    Open full screen modal! (With teleport!)
</button>
<teleport to="body">
  <div v-if="modalOpen" class="modal">
    <div>
      モーダルウィンドウのコンテンツ
      <button @click="modalOpen = false">
        モーダルウィンドウを閉じる
      </button>
    </div>
  </div>
</teleport>モーダルウィンドウをposition:fixedなどで実装したいケースにとても有用です。(画面全体にオーバーレイを貼りたい時等)親のpositionの値を確認するストレスから解放されるでしょう。
Fragments
Vue3 より Component へルートノードの設定が必須ではなくなりました。ReactJS の<></>よりもシンプルな記述が可能になります。
Vue2.x のシンタックス
<!-- Layout.vue -->
<template>
  <div>
    <header>...</header>
    <main>...</main>
    <footer>...</footer>
  </div>
</template>
Vue3 のシンタックス
<!-- Layout.vue -->
<template>
  <header>...</header>
  <main v-bind="$attrs">...</main>
  <footer>...</footer>
</template>
Emits Component Option
親から子供の Component へイベント及び v-model をシンプルに渡せるようになりました。
<!-- 親のComponent -->
<template>
  <StudentScore v-model:studentId="studentId" :student-name="studentName" @remove-student-by-id="removeStudentById" />
</template>
// 親のComponent
import { defineComponent, ref } from "vue";
import StudentScore from "./components/StudentScore.vue";
import { removeStudentById } from "../api/student";
export default defineComponent({
name: "App",
components: {
StudentScore,
},
setup() {
const studentId = ref<String>("exampleStudentId");
const studentName = "田中太郎";
const removeStudentById = (_studentId: String) => removeStudentById(_studentId);
return {
studentId,
studentName,
removeStudentById,
};
},
});// 子供のComponent
import { defineComponent, toRefs, emit } from "vue";
type Props = {
studentId: String,
studentName: String
}
export default defineComponent({
name: "StudentScore",
emits: ["update:studentId", "removeStudentById"],
setup(props:Props) {
const { studentId, studentName } = toRefs(props);
// emitを使用し親のイベントを実行
const removeStudentById = () => emit("removeStudentById", studentId.value);
// v-modelをPropsへ渡すことでupdate:{prop_name}が自動的にemitへアサインされる
const updateStudentId = () => emit("update:studentId", "update value!")
return {
studentId,
studentName,
removeStudentById,
updateStudentId
};
},
});emit がよりシンプルにエレガントな記述方法になりました!これにより Component 実装の幅がより広がったと思います。
まとめ
Vue2 から Vue3 へメジャーバージョンアップし、VueJS は大規模なアプリケーション開発に強く進化しました。以前まで VueJS は、ReactJS と比較して大規模に弱いといった評価をされ続けていましたがこれでどちらも遜色なくなった印象です。
私たちは HTML の書きやすさ・シンプルな構文などから、VueJS が今後伸びていくのでは?と期待をしています、皆さんもよろしければ VueJS を応援してみてください。
大規模・堅牢なフロントエンド開発は、ラーゲイトまでお気軽にお問い合わせください。
スモールスタート開発支援、サーバーレス・NoSQLのことなら
ラーゲイトまでご相談ください
低コスト、サーバーレスの
モダナイズ開発をご検討なら
 開発 をご希望の企業様
 下請け対応可能
Sler企業様からの依頼も歓迎
協業 をご希望の企業様 


ラーゲイトは、世界の最新技術を追い続ける
プロフェッショナルチームです。


