


Auth0 + Cognito IDプールで認証基盤を構築!
 2022.01.04


こんにちは!
今回は Auth0 と Cognito ID プールを組み合わせた認証基盤をご紹介いたします!ぜひ参考にしてください!
想定する読者
- Auth0 と AWS を組み合わせたいヒト
- Auth0 における認証基盤の構築について知りたいヒト
- Cognito の理解を深めたいヒト
はじめに
何かしらの要件で Cognito ユーザープールが利用できない場合、別の認証基盤サービスなどを利用するケースがあります。本記事はそういったケースで Auth0 を選択した場合の作成手順や必要なことなどを解説していきたいと思います。
Auth0 はどういう役割なのか?
AWSの認証基盤といえば、Cognito です。Cognito にはユーザープールと ID プールという種類があります。前者はユーザーを管理および認証し(認証)、後者は認証されたユーザーの情報をもとに権限を与えます(認可)。
Auth0 と Cognito を組み合わせる場合は、先ほど述べたユーザープールの機能を Auth0 が担う設計となります。
Auth0 と Cognito IDプールの組み合わせ
Auth0 と Cognito ID プールを組み合わせるには、以下の手順で連携する必要があります。
- Auth0 にて Applications の作成
- AWS にて Cognito ID プールの作成
- AWS にて IAM > ID プロバイダ を選択し、プロバイダを作成
1番は Auth0 のドキュメントを参考に作成してください。
2番と3番は以下の CloudFormation で実装できます。
Resources:
  # Auth0との連携
  IAMOIDCProvider:
    Type: AWS::IAM::OIDCProvider
    Properties:
      Url: https://YOUR_DOMAIN.com
      ClientIdList:
      - xxxxxxxxxxxxx
      ThumbprintList:
      - xxxxxxxxxxxxx

  # IDプールの構築
  IdentityPool:
    Type: AWS::Cognito::IdentityPool
    Properties:
      IdentityPoolName: auth0
      AllowUnauthenticatedIdentities: true
      OpenIdConnectProviderARNs:
      - !Ref IAMOIDCProvider

  # IDプールにIAMロールの設定
  IdentityPoolRoleAttachment:
    Type: AWS::Cognito::IdentityPoolRoleAttachment
    Properties:
      IdentityPoolId: !Ref IdentityPool
      # 認証成功時に与えるロールの指定
      Roles:
        'authenticated': !GetAtt AuthenticatedRole.Arn

  # ユーザー認証成功時に適用されるロール
  AuthenticatedRole:
    Type: AWS::IAM::Role
    Properties:
      RoleName: authenticated-role
      AssumeRolePolicyDocument:
        Version: '2012-10-17'
        Statement:
          - Effect: Allow
            Principal:
              Federated: cognito-identity.amazonaws.com
            Action: sts:AssumeRoleWithWebIdentity
            Condition:
              StringEquals:
                cognito-identity.amazonaws.com:aud: !Ref IdentityPool
              ForAnyValue:StringLike:
                cognito-identity.amazonaws.com:amr: authenticated
      Path: '/'
      # ポリシーの内容は適当です
      Policies:
        - PolicyName: AuthenticatedRolePolicy
          PolicyDocument:
            Version: '2012-10-17'
            Statement:
              - Effect: Allow
                Action: iam:ListGroups
                Resource: '*'
ここで IAMOIDCProvider の部分の説明をします。
ここには URL と ClientIdList と ThumbprintList に値をセットしなければなりませんが、これらは Auth0 のコンソールにて以下の場所で取得できます。(いずれも Applications の画面となります)
URL と ClientIdList の場所
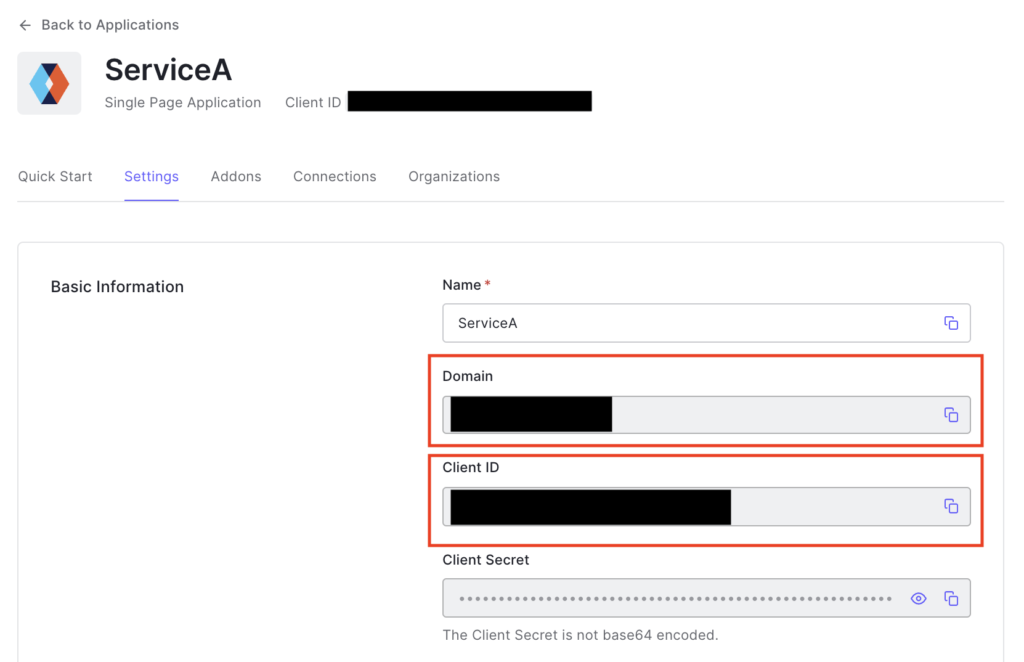
Client ID が ClientIdList の値です
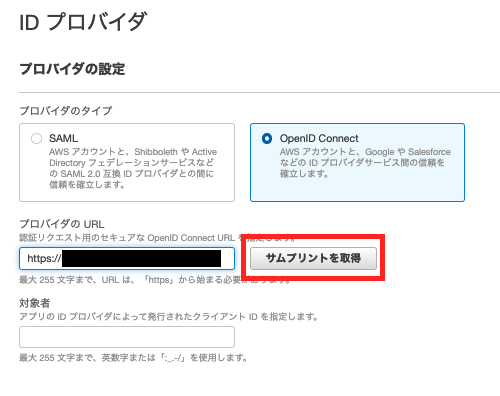
ThumbprintList の場所
こちらを参考に取得してください。ID プロバイダの登録には「サムプリント」というものが必要となります。
OpenID Connect ID プロバイダーのルート CA サムプリントの取得
実際の取得方法は以下になります。
【1】oidc の IDP のコンフィグを取得
GET https://YOUR_DOMAIN.jp.auth0.com/.well-known/openid-configuration{
"issuer": "string",
"authorization_endpoint": "string",
"token_endpoint": "string",
"device_authorization_endpoint": "string",
"userinfo_endpoint": "string",
"mfa_challenge_endpoint": "string",
"jwks_uri": "string",
"registration_endpoint": "string",
"revocation_endpoint": "string",
"scopes_supported": ["string"],
"response_types_supported": ["string"],
"code_challenge_methods_supported": ["string"],
"response_modes_supported": ["string"],
"subject_types_supported": ["string"],
"id_token_signing_alg_values_supported": ["string"],
"token_endpoint_auth_methods_supported": ["string"],
"claims_supported": ["string"],
"request_uri_parameter_supported": false
}【2】jwks を取得
GET https://YOUR_DOMAIN.jp.auth0.com/.well-known/jwks.json{
"keys": [
{
"alg": "RS256",
"kty": "RSA",
"use": "sig",
"n": "...",
"e": "...",
"kid": "...",
"x5t": "...",
"x5c": ["..."]
},
{
"alg": "RS256",
"kty": "RSA",
"use": "sig",
"n": "...",
"e": "...",
"kid": "...",
"x5t": "...",
"x5c": ["..."]
}
]
}【3】キーを certificate.crt に保存
openssl s_client - servername YOUR_DOMAIN.jp.auth0.com - showcerts - connect YOUR_DOMAIN.jp.auth0.com: 443※複数存在する場合は一番上のキーを保存
-----BEGIN CERTIFICATE-----
...
-----END CERTIFICATE-----
【4】証明書を作成
openssl x509 -in certificate.crt - fingerprint - noout上記コマンド入力後、文字列からコロン(:)を削除すると、サムプリントの文字列を取得できます。
GUI 上での確認方法
もしくは AWS のマネジメントコンソールにて ID プロバイダを作成する際に、URL を入力すると、自動で取得してくれます。
これにて Auth0 と Cognito ID プールの連携は完了です。
Auth0 の場合の IAM ロール選定
Cognito のみの認証基盤では、ユーザープールの情報(誰がどのグループに属しているか)をもとに ID プールから与える IAM ロールを選定します。Auth0 の場合は、Roles を用います。
以下のような Role を作成します。
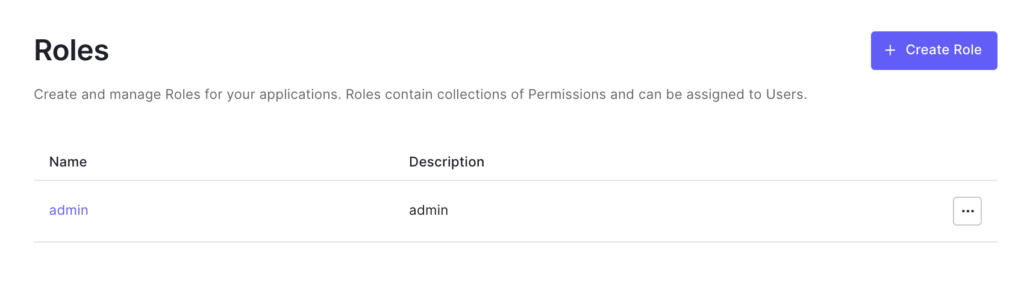
そのあとは、Auth0 側で以下の Rule を設定します。
function (user, context, callback) {
  const namespace = 'https://YOUR_DOMAIN.com/';
  const assignedRoles = (context.authorization || {}).roles;
  assignedRoles.forEach(roleStr => {
    context.idToken[namespace + "role/" + roleStr] = roleStr;
  });
  return callback(null, user, context);
}
上記の設定により Custom Claim を ID トークンに含めることができます。なお、namespace を設定しないと原則としてはIDトークンのクレームに情報を追加できませんので、その点は注意してください。
https://example.jp.atuh0.com/ の部分はご自身の Auth0 のドメイン名に置換してください。
なお Role 名を単一のオブジェクトとして取り出しているのは、複数形の場合 Cognito ID プールの RoleMapping で値を取得することができないからです。
次に Cognito ID プールにて以下のような CloudFormation で RoleMappings(指定したルールに応じて IAM ロールの付与を行う機能)を設定します。
Resources:
# IDプールにIAMロールの設定
IdentityPoolRoleAttachment:
Type: AWS::Cognito::IdentityPoolRoleAttachment
Properties:
IdentityPoolId: !Ref IdentityPool
Roles:
"authenticated": !GetAtt AuthenticatedRole.Arn
RoleMappings:
roleMapping:
AmbiguousRoleResolution: AuthenticatedRole
IdentityProvider: !GetAtt IAMAuth0OIDCProvider.Arn
RulesConfiguration:
Rules:`
- Claim: 'https://YOUR_DOMAIN.com/role/SystemAdministrator'
MatchType: Contains
RoleARN: !GetAtt SystemAdministratorAuthenticatedRole.Arn
Value: 'SystemAdministrator'
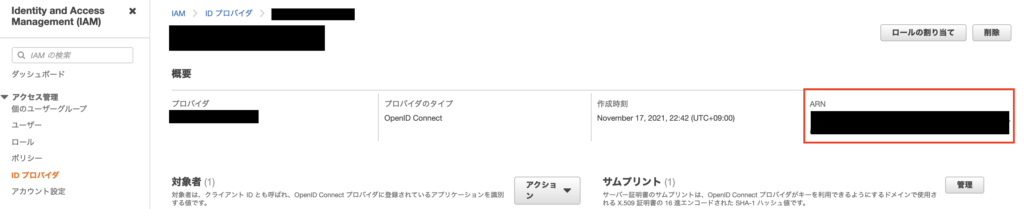
Type: Rulesなお IdentityProvider の ARN は以下の場所から確認できます。
これにて Auth0 の Roles に応じて IAMロールを切り分けることができます!
RoleMapping の仕組み
上記の設定を行なった状態で Auth0 にログインすると、以下の Claim が取得されます(一部削除して記載しております)。
{
  "https://YOUR_DOMAIN.com/roles": [
    "SystemAdministrator"
  ],
  "https://YOUR_DOMAIN.com/role/SystemAdministrator": "SystemAdministrator",
  "iss": "https://YOUR_DOMAIN.jp.auth0.com/",
  "sub": "auth0|61934efe31904c006aa79274",
  "aud": "xxxxxxxx",
  "iat": xxxxxxxx,
  "exp": xxxxxxxx,
}
この Claim のドメインが含まれている Key は、Auth0 の Rule でセットされたオブジェクトです。このオブジェクトの値を Cognito ID プールが、RoleMapping のルールに基づき付与する IAM ロールを選定します。
Auth0 の Rule 機能と Cognito ID プールの RoleMapping を組み合わせることでこの仕組みを実現しました。参考になれば幸いです。
関連記事
- Integrate with Amazon Cognito
- OpenID Connect ID プロバイダーのルート CA サムプリントの取得
- RoleMapping
- AWS CognitoとOAuth2.0/OpenIDConnectの連携方法・ユースケースを紹介!外部認証プロバイダーを使用したAWS Cognito構築を検討している方は必見です😎
- AWSで複数サービス間での共通認証基盤の構築方法!Cognito応用編!
- AWSサーバーレスで認証認可を最短・最速で実装!サーバーレスエキスパートが、CognitoによるAWSの認可実装を解説します😎
まとめ
上記の設定を行うことで、Cognito ユーザープールが行っていた役割を Auth0 で利用することができます。ニッチな領域にはなりますが、認証プロバイダの仕組みを理解していくにはこういった応用をやってみるのが一番ですので、Auth0 を利用されない方でも有益な記事になっているかと思います。ぜひご活用ください。
このブログでは、AWS の記事をどんどん公開しておりますので、ご興味のある方は他の記事もご覧いただければと思います。
AWS サーバーレスによる認証基盤開発に関する開発は、お気軽にお問い合わせください。
スモールスタート開発支援、サーバーレス・NoSQLのことなら
ラーゲイトまでご相談ください
低コスト、サーバーレスの
モダナイズ開発をご検討なら
 開発 をご希望の企業様
 下請け対応可能
Sler企業様からの依頼も歓迎
協業 をご希望の企業様 


ラーゲイトは、世界の最新技術を追い続ける
プロフェッショナルチームです。


